Quantcast
Channel: ネットワークエンジニアが日々の出来事を語る
Viewing all 250 articles
Browse latest View live

Raspberry Pi2にOpenVPNをインストールしてみた(事前準備編)

$
0
0

Raspberry Pi2にUbuntuをインストール

使用するOSはUbuntuにしてみました。RaspberryPiの公式サイトにあるのはUbuntu MATEで、インストールをGUIで行う必要があるっぽいです。そうなるとモニターやキーボードを用意しなければいけないため却下。いろいろ調べて見ると、Ubuntu Pi Flavour MakerというサイトでRaspberry Pi用のUbuntuのOSを公開しているようです。

Download | Ubuntu Pi Flavour Maker_wrm2l

Download | Ubuntu Pi Flavour Maker

今回は「Ubuntu Server (standard)」を使ってみます。Ubuntuをダウンロードしている間に、micro SDカードのフォーマットを実施します。


micro SDカードのフォーマット

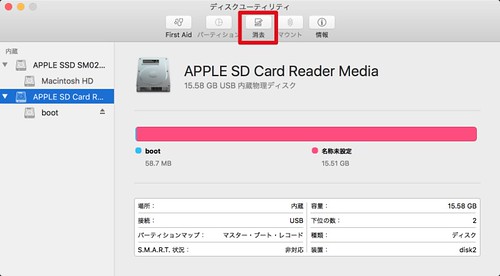
mac標準ツールのディスクユーティリティを使ってフォーマットを行います。ディスクユーティリティを起動して、SDカードを選択し「消去」。

ディスクユーティリティ_ck4xo

以上でフォーマット終了です。

Ubuntuのインストール

ダウンロードしたUbuntuイメージはxz形式で圧縮してありますので、「The Unarchiver」等の解凍ツールを使って解凍します。

ここからは以前紹介した「Raspberry Pi2 Model Bにディスプレイとキーボード無しでOSをインストール」と同じ方法でOSをSDカードに書き込みます。

書き込みが終了したらRaspberryPiにSDを差し込み起動させます。デフォルトのユーザ名とパスワードは以下の通り。

ユーザー名:ubuntu
パスワード:ubuntu

~/% ssh ubuntu@192.168.11.6
ubuntu@192.168.11.6's password:
Welcome to Ubuntu 16.04 LTS (GNU/Linux 4.1.19-v7+ armv7l)

 * Documentation:  https://help.ubuntu.com/

The programs included with the Ubuntu system are free software;
the exact distribution terms for each program are described in the
individual files in /usr/share/doc/*/copyright.

Ubuntu comes with ABSOLUTELY NO WARRANTY, to the extent permitted by
applicable law.

To run a command as administrator (user "root"), use "sudo <command>".
See "man sudo_root" for details.

ログインできたらSDカードの領域拡張を行います。fdiskコマンドを使って以下のように設定します。

※以降のコマンドは全て「sudo」で実施しています。

# fdisk /dev/mmcblk0
[sudo] password for ubuntu:

Welcome to fdisk (util-linux 2.27.1).
Changes will remain in memory only, until you decide to write them.
Be careful before using the write command.


Command (m for help): d
Partition number (1,2, default 2): 2

Partition 2 has been deleted.

Command (m for help): n
Partition type
   p   primary (1 primary, 0 extended, 3 free)
   e   extended (container for logical partitions)
Select (default p): p
Partition number (2-4, default 2): 2
First sector (133120-30425087, default 133120):
Last sector, +sectors or +size{K,M,G,T,P} (133120-30425087, default 30425087):

Created a new partition 2 of type 'Linux' and of size 14.5 GiB.

Command (m for help): w
The partition table has been altered.
Calling ioctl() to re-read partition table.
Re-reading the partition table failed.: Device or resource busy

The kernel still uses the old table. The new table will be used at the next reboot or after you run partprobe(8) or kpartx(8).

設定終了後に再起動を行います。

# reboot

起動後は「resize2fs」コマンドでリサイズします。

# resize2fs /dev/mmcblk0p2
[sudo] password for ubuntu:
resize2fs 1.42.13 (17-May-2015)
Filesystem at /dev/mmcblk0p2 is mounted on /; on-line resizing required
old_desc_blocks = 1, new_desc_blocks = 1
The filesystem on /dev/mmcblk0p2 is now 3786496 (4k) blocks long.

最後にお約束のパッケージのアップデートをしておきます。

# apt-get update
# apt-get upgrade

NTPのインストールと設定

NTPを使って時刻同期をするため、NTPをインストールして設定しておきます。

# apt-get install -y ntp
# vim /etc/ntp.conf

#pool 0.ubuntu.pool.ntp.org iburst
#pool 1.ubuntu.pool.ntp.org iburst
#pool 2.ubuntu.pool.ntp.org iburst
#pool 3.ubuntu.pool.ntp.org iburst
pool ntp.nict.jp iburst
# systemctl restart ntp
# ntpq -p
     remote           refid      st t when poll reach   delay   offset  jitter
==============================================================================
 ntp.nict.jp     .POOL.          16 p    -   64    0    0.000    0.000   0.002

タイムゾーンの設定と時刻の確認

デフォルトのタイムゾーンがUTCになっているので、JSTに変更します。

# timedatectl set-timezone Asia/Tokyo
# timedatectl
      Local time: Sun 2016-08-28 21:38:18 JST
  Universal time: Sun 2016-08-28 12:38:18 UTC
        RTC time: n/a
       Time zone: Asia/Tokyo (JST, +0900)
 Network time on: yes
NTP synchronized: yes
 RTC in local TZ: no

dateコマンドで確認します。

# date

「OpenVPNのインストール」に続きます。

Similar Posts:

Raspberry Pi2にOpenVPNをインストールしてみた(事前準備編) is a post from: ネットワークエンジニアを目指して


Raspberry Pi2にOpenVPNをインストールしてみた(OpenVPNインストール編)

$
0
0

OpenVPNのインストール

Raspberry Pi2にOpenVPNをインストールしてみた(事前準備編)に続いて、OpenVPNのインストールを行います。

必要なパッケージをインストールします。

# apt-get install openvpn openssl
# apt-get install openvpn libssl-dev openssl easy-rsa

続いて、認証局用のディレクトリを作成します。

# make-cadir /etc/openvpn/easy-rsa
# cd /etc/openvpn/easy-rsa

varsファイルの下記個所を自身の情報に変更します。

# vi vars

# These are the default values for fields
# which will be placed in the certificate.
# Don't leave any of these fields blank.
export KEY_COUNTRY="JP"
export KEY_PROVINCE="hogehoge"
export KEY_CITY="hogehoge"
export KEY_ORG="hogehoge"
export KEY_EMAIL="hoge@myhost.mydomain"
export KEY_OU="hoge"

# X509 Subject Field
export KEY_NAME="hoge"

varsファイルを変更したら、OpenVPNサーバー側の証明書、秘密鍵を作成します。

# source vars
NOTE: If you run ./clean-all, I will be doing a rm -rf on /etc/openvpn/easy-rsa/key
# ./clean-all
# ./build-ca
Generating a 2048 bit RSA private key
.............................................................................................+++
.......................................................................................................+++
writing new private key to 'ca.key'
-----
You are about to be asked to enter information that will be incorporated
into your certificate request.
What you are about to enter is what is called a Distinguished Name or a DN.
There are quite a few fields but you can leave some blank
For some fields there will be a default value,
If you enter '.', the field will be left blank.
-----
Country Name (2 letter code) [JP]:
State or Province Name (full name) [hoge]:
Locality Name (eg, city) [hoge]:
Organization Name (eg, company) [hoge]:
Organizational Unit Name (eg, section) [hoge]:
Common Name (eg, your name or your server's hostname) [Myoffice CA]:
Name [hoge]:
Email Address [hoge@myhost.mydomain]:
# ./build-key-server hoge
Generating a 2048 bit RSA private key
...........+++
.......................................................................+++
writing new private key to 'hoge.key'
-----
You are about to be asked to enter information that will be incorporated
into your certificate request.
What you are about to enter is what is called a Distinguished Name or a DN.
There are quite a few fields but you can leave some blank
For some fields there will be a default value,
If you enter '.', the field will be left blank.
-----
Country Name (2 letter code) [JP]:
State or Province Name (full name) [hoge]:
Locality Name (eg, city) [hoge]:
Organization Name (eg, company) [hoge]:
Organizational Unit Name (eg, section) [hoge]:
Common Name (eg, your name or your server's hostname) [hoge]:
Name [hoge]:
Email Address [hoge@myhost.mydomain]:

Please enter the following 'extra' attributes
to be sent with your certificate request
A challenge password []:
An optional company name []:
Using configuration from /etc/openvpn/easy-rsa/openssl-1.0.0.cnf
Check that the request matches the signature
Signature ok
The Subject's Distinguished Name is as follows
countryName           :PRINTABLE:'JP'
stateOrProvinceName   :PRINTABLE:'hoge'
localityName          :PRINTABLE:'hoge'
organizationName      :PRINTABLE:'hoge'
organizationalUnitName:PRINTABLE:'hoge'
commonName            :PRINTABLE:'hoge'
name                  :PRINTABLE:'hoge'
emailAddress          :IA5STRING:'hoge@myhost.mydomain'
Certificate is to be certified until Oct 14 10:31:02 2026 GMT (3650 days)
Sign the certificate? [y/n]:y


1 out of 1 certificate requests certified, commit? [y/n]y
Write out database with 1 new entries
Data Base Updated
root@ubuntu-standard:/etc/openvpn/easy-rsa#

最後に以下を実行してDiffie Hellmanパラメータを生成します。パラメータ生成は結構時間(10分以上)がかかりますので気長に待ちます。

# ./build-dh

サーバー、クライアント共通の秘密鍵を生成します。

# cd keys/
# openvpn --genkey --secret ta.key

クライアント鍵の作成

OpenVPNクライアント側の証明書、秘密鍵を作成します。

/etc/openvpn/easy-rsa# ./build-key-pass user1
Generating a 2048 bit RSA private key
................+++
...............................+++
writing new private key to 'user1.key'
Enter PEM pass phrase:
Verifying - Enter PEM pass phrase:
-----
You are about to be asked to enter information that will be incorporated
into your certificate request.
What you are about to enter is what is called a Distinguished Name or a DN.
There are quite a few fields but you can leave some blank
For some fields there will be a default value,
If you enter '.', the field will be left blank.
-----
Country Name (2 letter code) [JP]:
State or Province Name (full name) [hoge]:
Locality Name (eg, city) [hoge]:
Organization Name (eg, company) [hoge]:
Organizational Unit Name (eg, section) [hoge]:
Common Name (eg, your name or your server's hostname) [user1]:
Name [hoge]:
Email Address [hoge@myhost.mydomain]:

Please enter the following 'extra' attributes
to be sent with your certificate request
A challenge password []:
An optional company name []:
Using configuration from /etc/openvpn/easy-rsa/openssl-1.0.0.cnf
Check that the request matches the signature
Signature ok
The Subject's Distinguished Name is as follows
countryName           :PRINTABLE:'JP'
stateOrProvinceName   :PRINTABLE:'hoge'
localityName          :PRINTABLE:'hoge'
organizationName      :PRINTABLE:'hoge'
organizationalUnitName:PRINTABLE:'hoge'
commonName            :PRINTABLE:'user1'
name                  :PRINTABLE:'hoge'
emailAddress          :IA5STRING:'hoge@myhost.mydomain'
Certificate is to be certified until Oct 14 11:06:02 2026 GMT (3650 days)
Sign the certificate? [y/n]:y


1 out of 1 certificate requests certified, commit? [y/n]y
Write out database with 1 new entries
Data Base Updated

作成したファイルをOpenVPNディレクトリにコピーします。

# cp ca.crt ca.key hoge.crt hoge.key ta.key dh2048.pem /etc/openvpn
# cd /etc/openvpn/

次にserver.confの設定を行います。

# cp /usr/share/doc/openvpn/examples/sample-config-files/server.conf.gz /etc/openvpn/
# gzip -d /etc/openvpn/server.conf.gz
# cp server.conf server.conf.org
# vim server.conf

以下のように設定を変更します。

#################################################
# Sample OpenVPN 2.0 config file for            #
# multi-client server.                          #
#                                               #
# This file is for the server side              #
# of a many-clients <-> one-server              #
# OpenVPN configuration.                        #
#                                               #
# OpenVPN also supports                         #
# single-machine <-> single-machine             #
# configurations (See the Examples page         #
# on the web site for more info).               #
#                                               #
# This config should work on Windows            #
# or Linux/BSD systems.  Remember on            #
# Windows to quote pathnames and use            #
# double backslashes, e.g.:                     #
# "C:\\Program Files\\OpenVPN\\config\\foo.key" #
#                                               #
# Comments are preceded with '#' or ';'         #
#################################################

# Which local IP address should OpenVPN
# listen on? (optional)
;local a.b.c.d

# Which TCP/UDP port should OpenVPN listen on?
# If you want to run multiple OpenVPN instances
# on the same machine, use a different port
# number for each one.  You will need to
# open up this port on your firewall.
port 443

# TCP or UDP server?
;proto tcp
proto udp

# "dev tun" will create a routed IP tunnel,
# "dev tap" will create an ethernet tunnel.
# Use "dev tap0" if you are ethernet bridging
# and have precreated a tap0 virtual interface
# and bridged it with your ethernet interface.
# If you want to control access policies
# over the VPN, you must create firewall
# rules for the the TUN/TAP interface.
# On non-Windows systems, you can give
# an explicit unit number, such as tun0.
# On Windows, use "dev-node" for this.
# On most systems, the VPN will not function
# unless you partially or fully disable
# the firewall for the TUN/TAP interface.
;dev tap
dev tun

# Windows needs the TAP-Win32 adapter name
# from the Network Connections panel if you
# have more than one.  On XP SP2 or higher,
# you may need to selectively disable the
# Windows firewall for the TAP adapter.
# Non-Windows systems usually don't need this.
;dev-node MyTap

# SSL/TLS root certificate (ca), certificate
# (cert), and private key (key).  Each client
# and the server must have their own cert and
# key file.  The server and all clients will
# use the same ca file.
#
# See the "easy-rsa" directory for a series
# of scripts for generating RSA certificates
# and private keys.  Remember to use
# a unique Common Name for the server
# and each of the client certificates.
#
# Any X509 key management system can be used.
# OpenVPN can also use a PKCS #12 formatted key file
# (see "pkcs12" directive in man page).
ca ca.crt
cert hoge.crt
key hoge.key  # This file should be kept secret

# Diffie hellman parameters.
# Generate your own with:
#   openssl dhparam -out dh2048.pem 2048
dh dh2048.pem

# Network topology
# Should be subnet (addressing via IP)
# unless Windows clients v2.0.9 and lower have to
# be supported (then net30, i.e. a /30 per client)
# Defaults to net30 (not recommended)
;topology subnet

# Configure server mode and supply a VPN subnet
# for OpenVPN to draw client addresses from.
# The server will take 10.8.0.1 for itself,
# the rest will be made available to clients.
# Each client will be able to reach the server
# on 10.8.0.1. Comment this line out if you are
# ethernet bridging. See the man page for more info.
server 10.8.0.0 255.255.255.0

# Maintain a record of client <-> virtual IP address
# associations in this file.  If OpenVPN goes down or
# is restarted, reconnecting clients can be assigned
# the same virtual IP address from the pool that was
# previously assigned.
ifconfig-pool-persist ipp.txt

# Configure server mode for ethernet bridging.
# You must first use your OS's bridging capability
# to bridge the TAP interface with the ethernet
# NIC interface.  Then you must manually set the
# IP/netmask on the bridge interface, here we
# assume 10.8.0.4/255.255.255.0.  Finally we
# must set aside an IP range in this subnet
# (start=10.8.0.50 end=10.8.0.100) to allocate
# to connecting clients.  Leave this line commented
# out unless you are ethernet bridging.
;server-bridge 10.8.0.4 255.255.255.0 10.8.0.50 10.8.0.100

# Configure server mode for ethernet bridging
# using a DHCP-proxy, where clients talk
# to the OpenVPN server-side DHCP server
# to receive their IP address allocation
# and DNS server addresses.  You must first use
# your OS's bridging capability to bridge the TAP
# interface with the ethernet NIC interface.
# Note: this mode only works on clients (such as
# Windows), where the client-side TAP adapter is
# bound to a DHCP client.
;server-bridge

# Push routes to the client to allow it
# to reach other private subnets behind
# the server.  Remember that these
# private subnets will also need
# to know to route the OpenVPN client
# address pool (10.8.0.0/255.255.255.0)
# back to the OpenVPN server.
;push "route 192.168.10.0 255.255.255.0"
;push "route 192.168.20.0 255.255.255.0"
push "route 192.168.11.0 255.255.255.0"

# To assign specific IP addresses to specific
# clients or if a connecting client has a private
# subnet behind it that should also have VPN access,
# use the subdirectory "ccd" for client-specific
# configuration files (see man page for more info).

# EXAMPLE: Suppose the client
# having the certificate common name "Thelonious"
# also has a small subnet behind his connecting
# machine, such as 192.168.40.128/255.255.255.248.
# First, uncomment out these lines:
;client-config-dir ccd
;route 192.168.40.128 255.255.255.248
# Then create a file ccd/Thelonious with this line:
#   iroute 192.168.40.128 255.255.255.248
# This will allow Thelonious' private subnet to
# access the VPN.  This example will only work
# if you are routing, not bridging, i.e. you are
# using "dev tun" and "server" directives.

# EXAMPLE: Suppose you want to give
# Thelonious a fixed VPN IP address of 10.9.0.1.
# First uncomment out these lines:
;client-config-dir ccd
;route 10.9.0.0 255.255.255.252
# Then add this line to ccd/Thelonious:
#   ifconfig-push 10.9.0.1 10.9.0.2

# Suppose that you want to enable different
# firewall access policies for different groups
# of clients.  There are two methods:
# (1) Run multiple OpenVPN daemons, one for each
#     group, and firewall the TUN/TAP interface
#     for each group/daemon appropriately.
# (2) (Advanced) Create a script to dynamically
#     modify the firewall in response to access
#     from different clients.  See man
#     page for more info on learn-address script.
;learn-address ./script

# If enabled, this directive will configure
# all clients to redirect their default
# network gateway through the VPN, causing
# all IP traffic such as web browsing and
# and DNS lookups to go through the VPN
# (The OpenVPN server machine may need to NAT
# or bridge the TUN/TAP interface to the internet
# in order for this to work properly).
push "redirect-gateway def1 bypass-dhcp"

# Certain Windows-specific network settings
# can be pushed to clients, such as DNS
# or WINS server addresses.  CAVEAT:
# http://openvpn.net/faq.html#dhcpcaveats
# The addresses below refer to the public
# DNS servers provided by opendns.com.
;push "dhcp-option DNS 208.67.222.222"
;push "dhcp-option DNS 208.67.220.220"
push "dhcp-option DNS 192.168.11.1"
push "dhcp-option DNS 8.8.8.8"

# Uncomment this directive to allow different
# clients to be able to "see" each other.
# By default, clients will only see the server.
# To force clients to only see the server, you
# will also need to appropriately firewall the
# server's TUN/TAP interface.
client-to-client

# Uncomment this directive if multiple clients
# might connect with the same certificate/key
# files or common names.  This is recommended
# only for testing purposes.  For production use,
# each client should have its own certificate/key
# pair.
#
# IF YOU HAVE NOT GENERATED INDIVIDUAL
# CERTIFICATE/KEY PAIRS FOR EACH CLIENT,
# EACH HAVING ITS OWN UNIQUE "COMMON NAME",
# UNCOMMENT THIS LINE OUT.
duplicate-cn

# The keepalive directive causes ping-like
# messages to be sent back and forth over
# the link so that each side knows when
# the other side has gone down.
# Ping every 10 seconds, assume that remote
# peer is down if no ping received during
# a 120 second time period.
keepalive 10 120

# For extra security beyond that provided
# by SSL/TLS, create an "HMAC firewall"
# to help block DoS attacks and UDP port flooding.
#
# Generate with:
#   openvpn --genkey --secret ta.key
#
# The server and each client must have
# a copy of this key.
# The second parameter should be '0'
# on the server and '1' on the clients.
tls-auth ta.key 0 # This file is secret

# Select a cryptographic cipher.
# This config item must be copied to
# the client config file as well.
;cipher BF-CBC        # Blowfish (default)
cipher AES-128-CBC   # AES
;cipher DES-EDE3-CBC  # Triple-DES

# Enable compression on the VPN link.
# If you enable it here, you must also
# enable it in the client config file.
comp-lzo

# The maximum number of concurrently connected
# clients we want to allow.
;max-clients 100

# It's a good idea to reduce the OpenVPN
# daemon's privileges after initialization.
#
# You can uncomment this out on
# non-Windows systems.
user nobody
group nogroup

# The persist options will try to avoid
# accessing certain resources on restart
# that may no longer be accessible because
# of the privilege downgrade.
persist-key
persist-tun

# Output a short status file showing
# current connections, truncated
# and rewritten every minute.
status openvpn-status.log

# By default, log messages will go to the syslog (or
# on Windows, if running as a service, they will go to
# the "\Program Files\OpenVPN\log" directory).
# Use log or log-append to override this default.
# "log" will truncate the log file on OpenVPN startup,
# while "log-append" will append to it.  Use one
# or the other (but not both).
log         openvpn.log
log-append  openvpn.log

# Set the appropriate level of log
# file verbosity.
#
# 0 is silent, except for fatal errors
# 4 is reasonable for general usage
# 5 and 6 can help to debug connection problems
# 9 is extremely verbose
verb 3

# Silence repeating messages.  At most 20
# sequential messages of the same message
# category will be output to the log.
;mute 20

ファイアウォール等の設定

続いてファイアウォールとIPフォワーディング等の設定を変更します。

# ip route | grep default
default via 192.168.11.1 dev eth0
# vi /etc/ufw/before.rules

以下を先頭に追加

# START OPENVPN RULES
# NAT table rules
*nat
:POSTROUTING ACCEPT [0:0]
# Allow traffic from OpenVPN client to eth0
-A POSTROUTING -s 10.8.0.0/8 -o eth0 -j MASQUERADE
COMMIT
# END OPENVPN RULES

フォワーディングポリシーを変更します

# vi /etc/default/ufw

以下に変更

# Set the default forward policy to ACCEPT, DROP or REJECT.  Please note that
# if you change this you will most likely want to adjust your rules
DEFAULT_FORWARD_POLICY="ACCEPT"

OpenVPNのポートをファイアウォールに許可します。以下の例は、ポート番号を443に変更しているので適宜読み替えてください。

# ufw allow 443/udp

ufwサービスを再起動します。

# sudo ufw disable
Firewall stopped and disabled on system startup
# sudo ufw enable
Command may disrupt existing ssh connections. Proceed with operation (y|n)? y
Firewall is active and enabled on system startup

以上でサーバー側のOpenVPNのインストールと設定は終了です。

「クライアント側のOpenVPN設定と接続確認」に続きます。

Similar Posts:

Raspberry Pi2にOpenVPNをインストールしてみた(OpenVPNインストール編) is a post from: ネットワークエンジニアを目指して

Raspberry Pi2にOpenVPNをインストールしてみた(クライアント側のOpenVPN設定と接続確認編)

$
0
0

Raspberry Pi2にOpenVPNをインストールしてみた(OpenVPNインストール編)に続いて、クライアント側の設定を行います。

クライアントはMAC OSXで、OpenVPN接続ツールは「Tunnelblick」を使ってみます。

クライアント用OVPNファイル作成

クライアント側の設定はOVPNファイルがあると便利なので、サーバー側でOVPNファイルを作成するスクリプトを実行します。

まずOVPNファイルを作成する上で必要な設定ファイルを用意します。

# vi /etc/openvpn/easy-rsa/keys/make_ovpn_conf.txt

以下を入力。

client
dev tun
proto udp # 自身の環境に合わせて、tcp/udpを設定
remote hoge.jp 443 # 自身の環境に合わせて、外部からアクセスするドメインかIPアドレス、ポート番号を設定
resolv-retry infinite
nobind
persist-key
persist-tun
mute-replay-warnings
ns-cert-type server
key-direction 1
cipher AES-128-CBC
comp-lzo
verb 1
mute 20

続いてOVPNファイル作成用のスクリプトを準備します。

# vi /etc/openvpn/easy-rsa/keys/make_ovpn.sh
#!/bin/bash 

DEFAULT="make_ovpn_conf.txt" 
OVPNFILE=".ovpn" 
CRT=".crt" 
KEY=".3des.key" 
CA="ca.crt" 
TA="ta.key" 

echo "クライアント名を入力:"
read NAME 

if [ ! -f $NAME$CRT ]; then 
 echo "CRTファイルが見つかりません: $NAME$CRT" 
 exit 
fi 

if [ ! -f $NAME$KEY ]; then 
 echo "3desキーファイルが見つかりません: $NAME$KEY" 
 exit 
fi 

if [ ! -f $CA ]; then 
 echo "CAファイルが見つかりません: $CA" 
 exit 
fi 

if [ ! -f $TA ]; then 
 echo "TAファイルが見つかりません:$TA" 
 exit 
fi 

default file 
cat $DEFAULT > $NAME$OVPNFILE 

cat $CA >> $NAME$OVPNFILE 

cat $NAME$CRT | sed -ne '/-BEGIN CERTIFICATE-/,/-END CERTIFICATE-/p' >> $NAME$OVPNFILE

cat $NAME$KEY >> $NAME$OVPNFILE

cat $TA >> $NAME$OVPNFILE

echo "OVPNファイル作成完了"

ファイルに実行権限を与えて実行します。

# chmod 700 make_ovpn.sh
# ./make_ovpn.sh

作成したOVPNファイルをローカルのPCに保存しておきます。

併せて、サーバー上でOpenVPNサーバーを起動しておきます。まずはフォアグラウンドで動作しておきます。

# openvpn /etc/openvpn/server.conf

Tunnelblickのインストール

Tunnelblickのダウンロードページから、環境にあったファイルをダウンロードしてインストールします。

ダウンロードしたOVPNファイルをダブルクリックすると、以下のダイアログで表示されるので個人用をクリック。

Monosnap_hajeh

問題なくインストールが完了したら、上部ツールバー上にあるTunnelblickのアイコンをクリックし、該当のユーザーで接続してみます。

TunnelBlick を使って OpenVPN で接続する - Carpe Diem_dcokm

パスワードを聞かれるので事前に設定していたパスワードを入力します。

Tunnelblick: パスフレーズが必要です_vwakh

接続を開始すると以下のメッセージが表示されます。

Tunnelblick_jmzly

正常に接続が完了すると以下のメッセージが表示されます。

Tunnelblick_mpsb6

問題なく動作したら、サーバー上でOpenVPNをサービス化しておきます。

# systemctl enable openvpn
# systemctl start openvpn

スピードテストサイトで速度を測ってみる。

OpenVPNを使うことでどこまで速度が落ちるのかを確認してみました。確認に使ったサイトは「Speedtest」を使ってみます。

今回の環境では、OpenVPNを使った場合、自宅にあるRaspberry Piを経由してからスピード測定サイトにアクセスするため、純粋な比較にはならないためあくまでも参考程度に見ていただければ。ただし自宅のアクセス回線は100Mbpsなのでアクセス回線の帯域の影響は少ないと考えます。

Untitled (1)

OpenVPNを使用しない場合

no_ovpn

上りも下りも40Mbps以上でています。

OpenVPNを使用した場合

ovpn

上り、下りともに1Mbps程度にまで落ち込んでいます。

結構落ちてますね。OpenVPNの設定をチューニングすることで、パフォーマンスを改善出来るという情報をあるので、別途試してみたいと思います。

Similar Posts:

Raspberry Pi2にOpenVPNをインストールしてみた(クライアント側のOpenVPN設定と接続確認編) is a post from: ネットワークエンジニアを目指して

RaspberryPi 2にZabbixをインストールをしてみた

$
0
0

RaspberryPi 2にZabbixをインストールをしてみたので備忘メモ。

各種パッケージのインストール

% sudo apt-get -y install zabbix-server-mysql zabbix-agent zabbix-frontend-php php-mysql php-gd php-xml-util php-mbstring php-bcmath php-net-socket php-gettext 


PHPのインストールと設定

% apt-get -y install php php-cgi libapache2-mod-php php-common php-pear php-mbstring

% a2enconf php7.0-cgi 
Enabling conf php7.0-cgi.
To activate the new configuration, you need to run:
  service apache2 reload

% vi /etc/php/7.0/apache2/php.ini
post_max_size = 16M
max_execution_time = 300
max_input_time = 300
date.timezone = Asia/Tokyo

% systemctl restart apache2 

MySQLの設定

% mysql -uroot -p
mysql> create database zabbix character set utf8 collate utf8_bin;
mysql> grant all privileges on zabbix.* to zabbix@localhost identified by '<PASSWORD>';
mysql> exit

% cd /usr/share/zabbix-server-mysql
% zcat schema.sql.gz | mysql -v -uzabbix -p zabbix
% zcat images.sql.gz | mysql -v -uzabbix -p zabbix
% zcat data.sql.gz | mysql -v -uzabbix -p zabbix

Zabbixの設定

% sudo vi /etc/zabbix/zabbix_server.conf
DBHost=localhost
DBName=zabbix
DBUser=zabbix
DBPassword=<PASSWORD>

$ sudo service zabbix-server restart

always_populate_raw_post_data(PHP7で削除)のチェックを無効にする

PHP7を使う場合、「always_populate_raw_post_data」のチェックで引っかかるため、チェックしないように無効にします。

cp /usr/share/zabbix/includ
e/classes/setup/CFrontendSetup.php /usr/share/zabbix/include/classes/setup/CFrontendSetup.php.org
vim /usr/share/zabbix/include/classes/setup/CFrontendSetup.php
// check for deprecated PHP 5.6.0 option 'always_populate_raw_post_data'
if (version_compare(PHP_VERSION, '5.6', '>=')) {
         $result[] = $this->checkPhpAlwaysPopulateRawPostData();

上記行を以下に変更

// check for deprecated PHP 5.6.0 option 'always_populate_raw_post_data'
if (version_compare(PHP_VERSION, '7.1', '>=')) {
         $result[] = $this->checkPhpAlwaysPopulateRawPostData();

http:///zabbixにアクセスすると、Zabbixのセットアップページが表示されます。

次回はZabbixの初期設定を行っていきます。

Similar Posts:

RaspberryPi 2にZabbixをインストールをしてみた is a post from: ネットワークエンジニアを目指して

Ansible 2.2がリリース

$
0
0

11/1にAnsible2.2がリリースされたようです。

Ansible 2.2 Delivers New Automation Capabilities for Containers, Networks and Cloud Services

詳細はCHANGELOGを見てもらうとして、気になったポイントをメモっておきます。

変更点

  • listenモジュールの追加
  • パフォーマンスの向上
  • バイナリモジュールのサポート
  • rawにchanged_when: falseをサポート
  • include_role モジュールの追加で、task中にループや条件の付与が可能
  • python 3 がテックプレビュー

Ansible 2.2でようやくPython 3に対応したようですが、まだテックプレビューのようで、Ansible 2.3でも対応完了とはいかないようで、まだまだ時間がかかりそうです。

モジュール

今回、多くのネットワークモジュールがサポートされています。気になったモジュールは以下の通り

  • Cisco ASA
  • AWS
  • CloudStack
  • Docker(docker_network)
  • Dell OS
  • F5
  • IOS(ios_facts)
  • NetApp
  • NXOS
  • vyos
  • Windows(shell/command/robocopy)

Similar Posts:

Ansible 2.2がリリース is a post from: ネットワークエンジニアを目指して

サイバーセキュリティについてまとめてみる

$
0
0

サイバーセキュリティとは

サイバーとは、「インターネットやコンピュータ、ネットワークなどを利用した」という意味で、サイバー攻撃とは、これらコンピュータやインターネットなどを利用して、標的のコンピュータやネットワークに不正に侵入してデータの詐取や破壊、改ざんなどを行なったり、標的のシステムを機能不全に陥らせることを言います。サイバーセキュリティとは、このようなサイバー攻撃からの防御行為や安全確保を行うことを言います。

2016年に開催されたリオ五輪では、DoS攻撃が平均トラフィックが200Gbps以上、ピークでは540Gbpsに達したという報告もあります。世界規模のイベントはサイバー犯罪者たちにとっては恰好の標的となりやすく、イベントサイトを改ざんすることで、閲覧したユーザにマルウェアを仕込んだり、チケットの抽選結果の偽通知のスパムメールを送りつけるなど様々な手法を使います。

「サイバーセキュリティとは」の続きを読む。

Similar Posts:

サイバーセキュリティについてまとめてみる is a post from: ネットワークエンジニアを目指して

Google Cloud Visionを使ってみた

$
0
0

Google Cloud Visionを使ってみた

以前から使ってみようみようと思っていた、Google Cloud Visionをようやく使ってみました。

Google Cloud Visionとは、

Google Cloud Vision API は、強力な機械学習モデルの能力を活用することで、画像の内容を認識し理解できるアプリケーションの開発を可能にします。Cloud Vision API は、画像を数千のカテゴリ(たとえば、「ヨット」「ライオン」「エッフェル塔」など)にすばやく分類する機能や、画像に映る個々の物体や人物の顔を解析する機能、画像に含まれる活字体の文字を認識して読み取る OCR 機能などを提供します。 この Cloud Vision API により、アプリケーションで扱う多数の画像のタグ付け、不適切な画像の検出、画像の意味の分析に基づく新しいマーケティング手法への応用が可能です。画像はリクエストの中に含めてアップロードすることで分析し、また Google Cloud Storage 上の画像ストレージとの連携も可能です。

via:Vision API – 機械学習による画像認識, OCR  |  Google Cloud Platform

Google Cloud Visionを使うと以下のようなことができるようです。

  • 物体検知
    画像に含まれる物体を検知し、乗り物から動物まで多数のカテゴリの中から分類できます。
  • 有害コンテンツ検知
    画像に含まれるアダルト コンテンツや暴力コンテンツのような有害コンテンツを検知します。
  • ロゴ検知
    画像に含まれるポピュラーな商品や企業のロゴを検知します。
  • ランドマーク検知
    画像に含まれるポピュラーな自然構造物や人工構造物を検知します。
  • OCR
    画像に含まれるテキストを認識して抽出します。幅広い言語に対応し、言語の自動判定も可能です。OCR ソフトを利用していたものが、クラウドで実現できます。
  • 顔検知
    画像に映る複数の人物の顔を検知し、感情の状態や帽子類の着用といった顔の主な属性も識別します。ただし、個人の認識には対応していません。

事前準備

まずは、Google Cloud Visionを使うための準備を行います。

Googleにログインした状態で、以下のサイトにアクセスします。

Vision API – 機械学習による画像認識, OCR  |  Google Cloud Platform

「無料トライアルを開始」をクリック

01

もろもろ設定して「同意して続行」をクリック

02

その後、住所やクレジットカードを入力しろ的なフォームがでてきますので適宜入力します。

クレジットカードの入力について

Google Cloud Visionを使うには、請求が発生しなくても事前にクレジットカードの登録が必要になります。1000回/月の問い合わせまでは無料で、以降は回数に応じて料金が設定されています。
無用にクレジットカード情報を登録したくないという方は辞めておきましょう。また、以降の手順を進める方は、すべて自己責任でお願いします。

Google Cloud Platformの画面が出てきますので、「プロジェクトを作成」をクリック。

03

プロジェクト名を適宜入力して「作成」をクリック。
04

少し待てば、以下のように新しいプロジェクトが作成されます。

05

続いてCloud Vision APIを有効にします。左上のメニューボタンをクリックします。

06

メニューが表示されますので、「API Manager」をクリック。

07

「APIを有効にする」をクリック

08

検索フォームが表示されるので、「Cloud Vision API」と入力します。

09

「Google Cloud Vision API」が表示されるはずなのでクリック

10

「有効にする」をクリック

11

続いて認証情報の設定を行います。左側メニューの「認証情報」をクリック。

12

「認証情報を作成」からAPIキーを選択

13

作成したAPIキーが表示されます。

14

セキュリティを高めるために、「キーを制限」をクリックしてAPIへのアクセス制限をしておきましょう。今回はサーバーからアクセスさせたいため、「IPアドレス」を選択肢、リクエストを受け付けるIPアドレスを入力します。

15

物体検知 (LABEL_DETECTION)を試してみる

無事にAPIキーを取得できたら、実際に動作を確認してみます。サンプルコードは以下の通りです。

from base64 import b64encode
from os import makedirs
from os.path import join, basename
from sys import argv
import json
import requests

ENDPOINT_URL = 'https://vision.googleapis.com/v1/images:annotate'
RESULTS_DIR = 'jsons'
makedirs(RESULTS_DIR, exist_ok=True)

def make_image_data_list(image_filenames):
    img_requests = []
    for imgname in image_filenames:
        with open(imgname, 'rb') as f:
            ctxt = b64encode(f.read()).decode()
            img_requests.append({
                    'image': {'content': ctxt},
                    'features': [{
                        'type': 'LABEL_DETECTION',
                        'maxResults': 10
                    }]
            })
    return img_requests

def make_image_data(image_filenames):
    imgdict = make_image_data_list(image_filenames)
    return json.dumps({"requests": imgdict }).encode()

def request_ocr(api_key, image_filenames):
    response = requests.post(ENDPOINT_URL,
                            data=make_image_data(image_filenames),
                            params={'key': api_key},
                            headers={'Content-Type': 'application/json'})
    return response

if __name__ == '__main__':
    api_key, *image_filenames = argv[1:]
    if not api_key or not image_filenames:
        print("""
	    適切にAPIキーとイメージファイルを指定してください。
  
        $ python cvapi.py api_key image.jpg""")
    else:
        response = request_ocr(api_key, image_filenames)
        if response.status_code != 200 or response.json().get('error'):
            print(response.text)
        else:
            for idx, resp in enumerate(response.json()['responses']):
                imgname = image_filenames[idx]
                jpath = join(RESULTS_DIR, basename(imgname) + '.json')
                print (json.dumps(resp, indent=2))

実行方法は以下のようにコマンドを実行します。

% python3.5 cvapi.py APIキー 画像ファイル名

まずは以下の画像で試してみます。

01

{
  "labelAnnotations": [
    {
      "mid": "/m/05r5c",
      "score": 0.97654432,
      "description": "piano"
    },
    {
      "mid": "/m/04szw",
      "score": 0.9113102,
      "description": "musical instrument"
    },
    {
      "mid": "/m/011_f4",
      "score": 0.86833465,
      "description": "string instrument"
    },
    {
      "mid": "/m/02wfc4",
      "score": 0.82297486,
      "description": "fortepiano"
    },
    {
      "mid": "/m/012lk9",
      "score": 0.81312376,
      "description": "player piano"
    },
    {
      "mid": "/m/0bs7_0t",
      "score": 0.80425763,
      "description": "electronic device"
    },
    {
      "mid": "/m/05148p4",
      "score": 0.8033424,
      "description": "keyboard"
    },
    {
      "mid": "/m/07c1v",
      "score": 0.797169,
      "description": "technology"
    },
    {
      "mid": "/m/01pmyz",
      "score": 0.75289851,
      "description": "digital piano"
    },
    {
      "mid": "/m/01s0ps",
      "score": 0.7401467,
      "description": "electric piano"
    }
  ]
}

ちゃんとピアノと認識してくれています。続いては以下のクマのおもちゃで試してみます。

02

{
  "labelAnnotations": [
    {
      "mid": "/m/06fvc",
      "description": "red",
      "score": 0.9064768
    },
    {
      "mid": "/m/0138tl",
      "description": "toy",
      "score": 0.70904654
    },
    {
      "mid": "/m/02wbm",
      "description": "food",
      "score": 0.69156486
    },
    {
      "mid": "/m/0c9ph5",
      "description": "flower",
      "score": 0.67659795
    }
  ]
}

悪くない結果です。クマとは認識してくれませんでしたが、「赤」と「おもちゃ」を認識してくれています。最後にぐんまちゃんで試してみます。

03

{
  "labelAnnotations": [
    {
      "mid": "/m/01sdr",
      "score": 0.96886373,
      "description": "color"
    },
    {
      "mid": "/m/088fh",
      "score": 0.80589223,
      "description": "yellow"
    },
    {
      "mid": "/m/0153bq",
      "score": 0.75131446,
      "description": "mascot"
    },
    {
      "mid": "/m/0c9ph5",
      "score": 0.54446042,
      "description": "flower"
    },
    {
      "mid": "/m/0138tl",
      "score": 0.52193815,
      "description": "toy"
    },
    {
      "mid": "/m/0hr5k",
      "score": 0.52063161,
      "description": "festival"
    },
    {
      "mid": "/m/0250x",
      "score": 0.50722837,
      "description": "costume"
    }
  ]
}

んー、微妙。

文章検出(TEXT_DETECTION)を試してみる

続いて画像から文章検出するTEXT_DETECTIONを試してみます。スクリプトは以下の通り。

from base64 import b64encode
from os import makedirs
from os.path import join, basename
from sys import argv
import json
import requests

ENDPOINT_URL = 'https://vision.googleapis.com/v1/images:annotate'
RESULTS_DIR = 'jsons'
makedirs(RESULTS_DIR, exist_ok=True)

def make_image_data_list(image_filenames):
    img_requests = []
    for imgname in image_filenames:
        with open(imgname, 'rb') as f:
            ctxt = b64encode(f.read()).decode()
            img_requests.append({
                    'image': {'content': ctxt},
                    'features': [{
                        'type': 'TEXT_DETECTION',
                        'maxResults': 1
                    }]
            })
    return img_requests

def make_image_data(image_filenames):
    imgdict = make_image_data_list(image_filenames)
    return json.dumps({"requests": imgdict }).encode()

def request_ocr(api_key, image_filenames):
    response = requests.post(ENDPOINT_URL,
                            data=make_image_data(image_filenames),
                            params={'key': api_key},
                            headers={'Content-Type': 'application/json'})
    return response

if __name__ == '__main__':
    api_key, *image_filenames = argv[1:]
    if not api_key or not image_filenames:
        print("""
	    適切にAPIキーとイメージファイルを指定してください。
  
        $ python cvapi.py api_key image.jpg""")
    else:
        response = request_ocr(api_key, image_filenames)
        if response.status_code != 200 or response.json().get('error'):
            print(response.text)
        else:
            for idx, resp in enumerate(response.json()['responses']):
                imgname = image_filenames[idx]
                jpath = join(RESULTS_DIR, basename(imgname) + '.json')
                print(resp['textAnnotations'][0]['description'])

使用する画像は以下の夏目漱石の坊ちゃんの冒頭部分を画像にしたものを使用してみました。

04

実行結果は以下の通り。

坊っちゃん
夏目漱石
+目次
てっぽう
譲りの無鉄砲で小供の時から損ばかりしている。小学校に居る時分学校の二階から飛び降りて 週間ほど腰を抜かした事がある。なぜそんな無闇をしたと
聞く人があるかも知れぬ。別段深い理由でもない。新築の二階から首を出していたら、同級生の一人が冗談に、いくら威張っても、そこから飛び降りる事は出
来まい。融やーい。と囃したからである。小使に負ぶさって帰って来た時、おやじが大きな眼をして二階ぐらいから飛び降りて腰を抜かす奴があるかと云っ
たから、この次は抜かさずに飛んで見せますと答えた。
親類のものから西洋製のナイフを貰って奇麗な刃を日に翳して、友達に見せていたら、 人が光る事は光るが切れそうもないと云った。切れぬ事があるか
何でも切ってみせると受け合った。そんなら君の指を切ってみろと注文したから、何だ指ぐらいこの通りだと右の手の親指の甲をはすに切り込んだ。幸ナイフ
が小さいのと、親指の骨が堅かったので、今だに親指は手に付いている。しかし創痕は死ぬまで消えぬ。

ほぼ完璧!すばらしい精度です。もう少し判別しづらい画像を使ってみます。

07

大人の
きのこの山
厳選カカオ

素晴らしい!

まとめ

Cloud Vision APIの有用性を改めて確認できましたので、これを使って何かサービスを作ってみようかと思います。無料制限があるので、まずは個人用に作ってみようかな。

Similar Posts:

Google Cloud Visionを使ってみた is a post from: ネットワークエンジニアを目指して

投資家フレッド・ウィルソン氏の2017年テクノロジー業界予測

$
0
0

米国で著名な投資家フレッド・ウィルソン氏は、自身のブログで毎年テクノロジー業界の予測を行っているようで、2017年の予測記事がアップされていましたので意訳してみました。

What Is Going To Happen In 2017 – AVC

Happy New Year Everyone. Yesterday we focused on the past, today we are going to focus on the future, specifically this year we are now in. Here’s what I expect to happen this year: …

以下意訳。


トランプ次期大統領は、企業税と個人税を削減し、キャリード・インタレスト・キャピタル・ゲインの優遇措置を廃止することになるだろう。株式市場はすでにこれらの減税を織り込み済みのため、投資家にとっては期待通りの利益にはならないだろうが、7年半ぶりの強気相場は、この減税刺激の結果として拡大するだろう。あるいはトランプ大統領のボーンヘッド的な動きは避けられないようだ。我々はそのタイミングは分からない。キャピタルゲインの喪失は、個人投資家の税率がそれを下回るため、プロの投資家はあまり被害を被ることはないだろう。さらに、企業は、海外に閉じ込められた大量の資本を回収し、M&Aブームをもたらす現金余剰を生み出すための弁償として、低い税率を使用するだろう。これにより、古い企業がスタートアップを買収する原因となっている事態がさらに激化するだろう。

Snapchatの上場に後押しされIPO市場は白熱するだろう。2017年は、IPO熱に浮かれる彼らを支援する起業家とVCを探してほしい。私は、2017年は2000年以来より多くの技術IPOが見られると期待しています。

アドテック市場は、投資家と起業家がGoogleとFacebookが勝ち、それ以外は負けだと認めて、検索やソーシャル、モバイルビジネスの道を歩むだろう。2017年にはオンライン広告事業への資金調達はほとんど不可能であろう。しかし、FacebookやGoogleとは根本的に異なるサービスを広告主に提供することで、Snapchatのような新しいプレーヤーとTwitterのような既存のプレーヤーが登場するだろう。

SAASセクターは、従来のエンタープライズソフトウェア企業(Oracleなど)、成功したSAAS企業(Workdayなど)、非公開企業のすべてが、追加サービスやと定期的なサブスクリプション型収入を求めて、強固な地位を築いていくだろう。

AIは新しいモバイルになるでしょう。投資家は、投資の前に「AI戦略」が何であるかを経営陣に尋ね、それを持たない企業には警戒するだろう。

テック系投資家は、さらなる「情報技術」の投資カテゴリーにゲノミクスを採用し始め、過去30年間にVCセクターに存在していたハイテクとライフサイエンスの区別を曖昧にしていくだろう。これは資金の狂気につながり、多くの投資はうまくいかないだろう。しかし、この部門には大きな勝者がいますし、近い将来VCにとって重要なカテゴリーになるでしょう。

グーグル、フェイスブック、そしてそれほどではないが、アップルとアマゾンは、米国の政府と個人による独占企業と見なされるだろう。フェイク・ニュースの危機のような事件が、我々がこれらの技術力の強さにどのように頼っているのか、そして反発があることを皆に明らかにするでしょう。それは復活したマイクロソフトの恩恵を受け、政府は無益な改善措置を模索するだろう。しかし、マイクロソフトの状況と同様に、オープンデータプラットフォーム(ブロックチェーンテクノロジなど)に基づいて構築された分散アプリケーションは、これらの独占企業への依存を減らし、救済することになるだろう。このシナリオは展開されるまでに時間がかかるが、種は蒔かれ、2017年にこのシナリオが始まることが見え始めます。

冷戦中に核戦争が起こったのと同じように、サイバー戦争は私たちの生活の中で中心となるだろう。私たちは秘密鍵の使い方や管理方法について学ぶ必要があるだろう。企業は使いやすいインターフェースを通して暗号を主流にすることで、次の大きな目玉になるでしょう。

具体的なことというよりは、市場の大きな流れについて予測していますね。AIについては少しだけ、IoTについては言及すらしていないのは、個人的には気になるところ。

Similar Posts:

投資家フレッド・ウィルソン氏の2017年テクノロジー業界予測 is a post from: ネットワークエンジニアを目指して


ひとりSlack始めました

$
0
0

slack-ci-640x300

Slackは仕事でもプライベートでも使用していて、常に常駐させていることもあり個人で使用する情報やメモもSlackに集めれば効率上がるんじゃねえかと思い「ひとりSlack」を始めてみました。

Slackと他アプリケーションとの連携

ひとりSlackを始めるにあたって、予定表やメールをSlackに流したいというニーズがあったのですが、Slackには他アプリと連携するためのIntegrationもありますし、IFTTTmyThingsZapierといった連携サービスを使用することで大部分のニーズを満たすことができています。

実践していること

用途別にチャンネルを分けています。それぞれのチャンネルの用途は以下の通り。


01_today

基本的に毎日確認したい情報を流すためのチャンネルです。毎日見たいためクライアントへの通知もオンにしています。

  • スケジュールのリマインド

    SlackのGoogle Calendar Integrationを使用して、Google カレンダーの予定を朝まとめてリマインドするようにしています。また月曜日の朝はその週の予定一覧もリマインドするようにして、一週間の予定を確認できるようにしています。

  • 天気予報の投稿

    毎朝、その日の天気予報を投稿しるようにしています。連携には、myThingsを使用してYahoo!天気の情報を流しています。

  • タスク管理

    タスク管理はWunderlistを使用しているので、SlackのWundelist Integrationを使用して、毎朝その日のタスクを流すようにしています。

02_memo

その名の通り、日々の気づきやメモなどを投稿するチャンネル。PCやスマホなど、いろんなデバイスから見れるので便利です。

03_mail

IFTTTでGmailの特定のラベルのついたメールを流すようにしています。ラベルはGmail側の振り分け設定で付けていて、ヤマト運輸や佐川急便の配達予定お知らせメールや銀行の入金/出金のメールなどを設定しています。即時性が求められる情報なので、クライアントへの通知はオンにしています。

04_event

connpassdots.などの勉強会情報のFeedを流すためのチャンネル。ただしどちらも積極的にFeedを公開してくれてないので、現時点ではconnpassの新着イベントのFeedのみ登録しています。流れる情報の数が多いのでクライアントへの通知はオフ。

05_data

slackのDatabox Integrationを使用して、自サイトのGoogleアドセンスやアナリティクスの情報を毎朝流すようにしています。

06_rss

SlackのRSS Integrationを使用して、RSSフィードを流しています。あまり多く登録しても見逃すフィードも出てくるので、厳選して10個くらいを登録しています。リアルタイムに知る情報ではないので、クライアントへの通知はオフにしています。

07_twitter

IFTTTを使って、エゴサーチした結果を流しています。ドメイン「itbook.info」が含まれたつぶやきがあった場合に、このチャンネルに流れてきます。こちらもクライアントへの通知はオフ。

情報を一個所に集めることの意味

Slackに情報を集めることで、Slackを見るだけで一通りの情報収集が出来るというのはかなり作業時間の効率向上になっています。ただし、まだ流したい情報があるので適宜追加していきたいなと。

  • 特定の株価情報を流したい
  • 電車の遅延情報を流したい
  • 残しておきたい情報やメモを外部にExportしたい
  • ポモドーロテクニックとSlackを連携させてタスクの開始/終了をログとして残したい

注意点

無料版のSlackはストレージ容量が5Gまで、保存可能なメッセージ数は10000件までという制限があるため、古いメッセージやファイルは消えてしまうことを前提に運用する必要があります。

残しておきたいファイルやメッセージは事前にExportするようにしましょう。

Similar Posts:

ひとりSlack始めました is a post from: ネットワークエンジニアを目指して

マルチベンダーなネットワーク機器を制御出来るPythonライブラリ「NAPALM」を試してみた

$
0
0

マルチベンダーなネットワーク機器を制御出来るPythonライブラリ「NAPALM」を試してみた

NANOG 69で「Saltstack + NAPALM」を使ったネットワーク・オートメーションに関するプレゼンがありました。

1_Ulinic_Network_Automation_At_v1.pdf

Saltstackとは

Saltstackは、ChefやPuppet、Ansibleなどと同じ構成管理ツールです。日本でのSaltstackの知名度はイマイチですが、Ansible並に簡単に導入できて、Chef以上に機能が豊富なことがウリのようです。

ただし、まだまだマイナーなためコミュニティも弱く、日本語の情報も少ない点がデメリットです。

SaltStack automation for CloudOps, ITOps & DevOps at scale

NAPALMとは

NAPALM(Network Automation and Programmability Abstraction Layer with Multivendor support)はネットワーク機器の設定や情報を取得するためのオープンなPythonライブラリです。NAPALMを使うことでマルチベンダー製品を統一化されたインタフェースで制御することが可能です。動作イメージとしては、AristaのeAPIやJuniperのPyEZなどの公式APIやNETCONF、netmikoなどのコミュニティが開発したPythonライブラリなどの様々なAPIやライブラリを裏で動かして、その上にキャップを被せたツールがNAPALMになります。

SaltStackだけでなく、Ansibleとも連携が可能です。

昨今のネットワークはマルチベンダーで組む場合が増えてきていますので、そのような運用者にとっては便利なライブラリだと思います。

Welcome to NAPALM’s documentation! — NAPALM 1 documentation

napalm-automation/napalm: Network Automation and Programmability Abstraction Layer with Multivendor support

今回はNAPALMを使って、実際にいくつかのネットワーク機器を制御してみます。


NAPALMがサポートするネットワーク機器

現時点(2017年2月)でNAPALMがサポートするネットワークには以下のようなものがあります。

  • Arista EOS
  • Cisco IOS
  • Cisco IOS-XR
  • Cisco NX-OS
  • Fortinet Fortios
  • IBM
  • Juniper JunOS
  • Mikrotik RouterOS
  • Palo Alto NOS
  • Pluribus
  • Vyos

NAPALMがサポートしている機能

NAPALMが制御可能な機能には以下の様なものがあります。

  • get_arp_table
    APRテーブルの取得
  • get_bgp_config
    BGP設定の取得
  • get_bgp_neighbors
    BGPネイバーの取得
  • get_bgp_neighbors_detail
     詳細なBGPネイバーの取得
  • get_config
     設定の取得
  • get_environment
     環境情報の取得
  • get_facts
     装置情報の取得
  • get_firewall_policies
     FWポリシーの取得
  • get_interfaces
     インタフェース情報の取得
  • get_interfaces_counters
     インタフェースカウンターの取得
  • get_interfaces_ip
     インタフェースに設定しているIPアドレスの取得
  • get_lldp_neighbors
     LLDPネイバー情報の取得
  • get_lldp_neighbors_detail
     詳細なLLDPネイバー情報の取得
  • get_mac_address_table
     MACアドレステーブルの取得
  • get_network_instances
     ネットワーク情報の取得
  • get_ntp_peers
     NTP情報の取得
  • get_ntp_servers
    NTP情報の取得
  • get_ntp_stats
    NTP情報の取得
  • get_optics
    光出力情報の取得
  • get_probes_config
    プローブ情報の取得
  • get_probes_results
    プローブ情報の取得
  • get_route_to
    ルーティング情報の取得
  • get_snmp_information
    SNMP情報の取得
  • get_users
    ユーザー情報の取得
  • is_alive
    接続状態の取得
  • ping
    Ping情報の取得
  • traceroute
    Traceroute情報の取得

上記機能はベンダーごとにサポート有無が異なります。詳細は以下のURL参照。

Supported Devices — NAPALM 1 documentation

NAPALMを試してみる

インストール

今回はOSX 10.12.3上で試してみます。pipを使用してインストールします。

% pip install napalm

% pip list | grep napalm
napalm (1.1.0)
napalm-base (0.23.0)
napalm-eos (0.5.3)
napalm-fortios (0.3.1)
napalm-ibm (0.1.7)
napalm-ios (0.6.1)
napalm-iosxr (0.4.8)
napalm-junos (0.6.4)
napalm-nxos (0.5.0)
napalm-panos (0.4.0)
napalm-pluribus (0.5.1)

% pip show napalm
Name: napalm
Version: 1.1.0
Summary: Network Automation and Programmability Abstraction Layer with Multivendor support
Home-page: https://github.com/napalm-automation/napalm
Author: David Barroso
Author-email: dbarrosop@dravetech.com
License: UNKNOWN
Location: /Users/itbook/.pyenv/versions/2.7.8/lib/python2.7/site-packages
Requires: napalm-iosxr, napalm-ibm, napalm-eos, napalm-nxos, napalm-fortios, napalm-panos, napalm-junos, napalm-base, napalm-ios, napalm-pluribus

Arista

続いて情報を取得するルータを準備します。今回はAristaとJuniperのルータを使用してみます。

Arista EOSの設定は以下の通り

EOS-1#sh run
! Command: show running-config
! device: EOS-1 (CVX, EOS-4.15.7M)
!
! boot system flash:/EOS.swi
!
transceiver qsfp default-mode 4x10G
!
hostname EOS-1
!
spanning-tree mode mstp
!
no aaa root
!
username test secret 5 $1$m8/K6n.m$AD0jR8r07N7wYRMLmIAPs/
!
interface Management1
   ip address 172.16.41.2/24
!
no ip routing
!
management api http-commands
   protocol http
   no shutdown
!
!
end
EOS-1#show version
Arista CVX
Hardware version:
Serial number:
System MAC address:  000c.29f1.b416

Software image version: 4.15.7M
Architecture:           i386
Internal build version: 4.15.7M-3284043.4157M
Internal build ID:      b0b0dff8-c9ca-40cc-a625-7fd3c8c76ebd

Uptime:                 5 hours and 25 minutes
Total memory:           2513796 kB
Free memory:            179944 kB

Aristaから情報を取得するにはeAPIを使用しますので、eAPIを有効にしています。

Juniper

Juniperの設定は以下の通り

srx1@srx1> show configuration
## Last commit: 2016-11-30 16:49:26 JST by root
version 15.1X49-D60.7;
groups {
    node0 {
        system {
            host-name srx1;
        }
        interfaces {
            fxp0 {
                unit 0 {
                    family inet {
                        address 172.16.41.10/24;
                    }
                }
            }
        }
    }
    node1 {
        system {
            host-name srx2;
        }
        interfaces {
            fxp0 {
                unit 0 {
                    family inet {
                        address 172.16.41.11/24;
                    }
                }
            }
        }
    }
}
apply-groups "${node}";
system {
    host-name srx1;
    time-zone Asia/Tokyo;
    root-authentication {
        encrypted-password "$5$LL2YpvKd$OFdFNzb/f/9/K0az5IRtxKK3rZgwZYZCozLDA14v9/D"; ## SECRET-DATA
    }
    login {
        user srx1 {
            uid 2000;
            class super-user;
            authentication {
                encrypted-password "$5$qasOhBQ7$s7QyQgvvDdNT5GKyCx1coLop5F9yXLtoeuJUidEy4O7"; ## SECRET-DATA
            }
        }
    }
    services {
        ssh {
            protocol-version v2;
        }
        web-management {
            http {
                interface fxp0.0;
            }
        }
    }
    syslog {
        user * {
            any emergency;
        }
        file messages {
            any any;
            authorization info;
        }
        file interactive-commands {
            interactive-commands any;
        }
    }
    license {
        autoupdate {
            url https://ae1.juniper.net/junos/key_retrieval;
        }
    }
}
security {
    screen {
        ids-option untrust-screen {
            icmp {
                ping-death;
            }
            ip {
                source-route-option;
                tear-drop;
            }
            tcp {
                syn-flood {
                    alarm-threshold 1024;
                    attack-threshold 200;
                    source-threshold 1024;
                    destination-threshold 2048;
                    queue-size 2000; ## Warning: 'queue-size' is deprecated
                    timeout 20;
                }
                land;
            }
        }
    }
    policies {
        from-zone trust to-zone trust {
            policy default-permit {
                match {
                    source-address any;
                    destination-address any;
                    application any;
                }
                then {
                    permit;
                }
            }
        }
        from-zone trust to-zone untrust {
            policy default-permit {
                match {
                    source-address any;
                    destination-address any;
                    application any;
                }
                then {
                    permit;
                }
            }
        }
    }
    zones {
        security-zone trust {
            tcp-rst;
        }
        security-zone untrust {
            screen untrust-screen;
        }
    }
}
interfaces {
    fxp0 {
        unit 0;
    }
}
srx1@srx1> show version
node0:
--------------------------------------------------------------------------
Hostname: srx1
Model: vsrx
Junos: 15.1X49-D60.7
JUNOS Software Release [15.1X49-D60.7]

NAPALMを使ったコンフィグの取得

準備が整いましたので、NAPALMを使用してコンフィグを取得してみます。
コンフィグ取得はget_config()を使用します。

Arista

% more get_conf_arista.py
#! /usr/bin/env python
# -*- coding: utf-8 -*-

import napalm

driver = napalm.get_network_driver('eos')
device = driver(
    hostname='172.16.41.2',
    username='test',
    password='test' )

print 'Device Opening ...',
device.open()
print 'OK\n'

result = device.get_config()

print result[u'running']

print 'Device Closing ...',
device.close()
print 'Done'

実行結果は以下の通りです。

% python get_conf_arista.py
Device Opening ...
OK
! Command: show running-config
! device: EOS-1 (CVX, EOS-4.15.7M)
!
! boot system flash:/EOS.swi
!
transceiver qsfp default-mode 4x10G
!
hostname EOS-1
!
spanning-tree mode mstp
!
no aaa root
!
username test secret 5 $1$m8/K6n.m$AD0jR8r07N7wYRMLmIAPs/
!
interface Management1
   ip address 172.16.41.2/24
!
no ip routing
!
management api http-commands
   protocol http
   no shutdown
!
!
end

Device Closing ... Done

Juniper

% more get_conf_juniper.py
#! /usr/bin/env python
# -*- coding: utf-8 -*-

import napalm

driver = napalm.get_network_driver('junos')
device = driver(
    hostname='172.16.41.10',
    username='srx1',
    password='test' )

print 'Device Opening ...',
device.open()
print 'OK\n'

result = device.get_config()

print result[u'running']

print 'Device Closing ...',
device.close()
print 'Done'

実行結果は以下の通り。

% python get_conf_juniper.py
Device Opening ... OK


## Last commit: 2016-11-30 16:49:26 JST by root
version 15.1X49-D60.7;
groups {
    node0 {
        system {
            host-name srx1;
        }
        interfaces {
            fxp0 {
                unit 0 {
                    family inet {
                        address 172.16.41.10/24;
                    }
                }
            }
        }
    }
    node1 {
        system {
            host-name srx2;
        }
        interfaces {
            fxp0 {
                unit 0 {
                    family inet {
                        address 172.16.41.11/24;
                    }
                }
            }
        }
    }
}
apply-groups "${node}";
system {
    host-name srx1;
    time-zone Asia/Tokyo;
    root-authentication {
        encrypted-password "$5$LL2YpvKd$OFdFNzb/f/9/K0az5IRtxKK3rZgwZYZCozLDA14v9/D";
    }
    login {
        user srx1 {
            uid 2000;
            class super-user;
            authentication {
                encrypted-password "$5$qasOhBQ7$s7QyQgvvDdNT5GKyCx1coLop5F9yXLtoeuJUidEy4O7";
            }
        }
    }
    services {
        ssh {
            protocol-version v2;
        }
        web-management {
            http {
                interface fxp0.0;
            }
        }
    }
    syslog {
        user * {
            any emergency;
        }
        file messages {
            any any;
            authorization info;
        }
        file interactive-commands {
            interactive-commands any;
        }
    }
    license {
        autoupdate {
            url https://ae1.juniper.net/junos/key_retrieval;
        }
    }
}
security {
    screen {
        ids-option untrust-screen {
            icmp {
                ping-death;
            }
            ip {
                source-route-option;
                tear-drop;
            }
            tcp {
                syn-flood {
                    alarm-threshold 1024;
                    attack-threshold 200;
                    source-threshold 1024;
                    destination-threshold 2048;
                    queue-size 2000;
                    timeout 20;
                }
                land;
            }
        }
    }
    policies {
        from-zone trust to-zone trust {
            policy default-permit {
                match {
                    source-address any;
                    destination-address any;
                    application any;
                }
                then {
                    permit;
                }
            }
        }
        from-zone trust to-zone untrust {
            policy default-permit {
                match {
                    source-address any;
                    destination-address any;
                    application any;
                }
                then {
                    permit;
                }
            }
        }
    }
    zones {
        security-zone trust {
            tcp-rst;
        }
        security-zone untrust {
            screen untrust-screen;
        }
    }
}
interfaces {
    fxp0 {
        unit 0;
    }
}

Device Closing ... Done

NAPALMを使ったARPテーブルの取得

ARPテーブル情報を取得するには、get_arp_table()関数を利用します。

Arista

% more get_arp_arista.py
#! /usr/bin/env python
# -*- coding: utf-8 -*-

import napalm

driver = napalm.get_network_driver('eos')
device = driver(
    hostname='172.16.41.2',
    username='test',
    password='test' )

print 'Device Opening ...',
device.open()
print 'OK\n'

result = device.get_arp_table()

print result

print 'Device Closing ...',
device.close()
print 'Done'

実行結果は以下の通り。

% python get_arp_arista.py
Device Opening ... OK

[{u'interface': u'Management1', u'ip': u'172.16.41.1', u'mac': u'00:50:56:C0:00:01', u'age': 0.0}]
Device Closing ... Done

実機での確認結果は以下の通り。

EOS-1#show arp
Address         Age (min)  Hardware Addr   Interface
172.16.41.1             0  0050.56c0.0001  Management1

Juniper

% more get_arp_juniper.py
#! /usr/bin/env python
# -*- coding: utf-8 -*-

import napalm

driver = napalm.get_network_driver('junos')
device = driver(
    hostname='172.16.41.10',
    username='srx1',
    password='test' )

print 'Device Opening ...',
device.open()
print 'OK\n'

result = device.get_arp_table()

print result

print 'Device Closing ...',
device.close()
print 'Done'

実行結果は以下の通り。

% python get_arp_juniper.py
Device Opening ... OK

[{'interface': u'fab0.0', 'ip': u'30.17.0.2', 'mac': u'4C:96:14:23:62:B0', 'age': None}, {'interface': u'em0.0', 'ip': u'129.16.0.16', 'mac': u'00:50:56:20:7C:04', 'age': 1090.0}, {'interface': u'fxp0.0', 'ip': u'172.16.41.1', 'mac': u'00:50:56:C0:00:01', 'age': 981.0}, {'interface': u'em1.32768', 'ip': u'192.168.1.1', 'mac': u'AA:BB:CC:DD:EE:FF', 'age': 558.0}]
Device Closing ... Done

実機での確認結果は以下の通り。

srx1@srx1> show arp
MAC Address       Address         Name                      Interface               Flags
4c:96:14:23:62:b0 30.17.0.2       30.17.0.2                 fab0.0                  permanent
00:50:56:20:7c:04 129.16.0.16     129.16.0.16               em0.0                   none
00:50:56:c0:00:01 172.16.41.1     172.16.41.1               fxp0.0                  none
aa:bb:cc:dd:ee:ff 192.168.1.1     192.168.1.1               em1.32768               none
Total entries: 4

まとめ

NAPALMを使用することで、コマンドを意識せずにマルチベンダー環境における自動化が行えるのは、種類が多ければ多いほど運用工数を削減できそうです。調べて見ると、NAPALMは現在も活発に開発が続けられているので、今後も機能は追加されていくと思います。

次回は、「Ansible + NAPALM」か「Saltstack + NAPALM」を試してみようと思います。

Similar Posts:

マルチベンダーなネットワーク機器を制御出来るPythonライブラリ「NAPALM」を試してみた is a post from: ネットワークエンジニアを目指して

AnsibleとNAPALMの連携を試してみた

$
0
0

前回マルチベンダーなネットワーク機器を制御出来るPythonライブラリ「NAPALM」を試してみたので、今回はAnsibleとNAPALMの連携を試してみました。

検証環境

検証環境は以下の通り


NAPALM

% pip show napalm
Name: napalm
Version: 1.1.0
Summary: Network Automation and Programmability Abstraction Layer with Multivendor support
Home-page: https://github.com/napalm-automation/napalm
Author: David Barroso
Author-email: dbarrosop@dravetech.com
License: UNKNOWN
Location: /Users/itbook/.pyenv/versions/2.7.8/lib/python2.7/site-packages
Requires: napalm-iosxr, napalm-ibm, napalm-pluribus, napalm-eos, napalm-nxos, napalm-fortios, napalm-panos, napalm-junos, napalm-base, napalm-ios

Ansible

% ansible --version
ansible 2.1.0.0
  config file =
  configured module search path = Default w/o overrides

AnsibleとNAPALMを連携するライブラリ

以下のライブラリを使っています。

napalm-automation/napalm-ansible

Arista

eos-1#show version
Arista CVX
Hardware version:
Serial number:
System MAC address:  000c.29f1.b416

Software image version: 4.15.7M
Architecture:           i386
Internal build version: 4.15.7M-3284043.4157M
Internal build ID:      b0b0dff8-c9ca-40cc-a625-7fd3c8c76ebd

Uptime:                 15 hours and 51 minutes
Total memory:           2513796 kB
Free memory:            174616 kB

デバイス情報を取得

Playbookはこんな感じ。

% more playbooks/get-facts.yml
---
- name: Get Device data
  hosts: all
  gather_facts: no
  connection: local
  tasks:
  - name: Get data from device
    napalm_get_facts:
      hostname={{ip}}
      username={{user}}
      dev_os={{os}}
      password={{passwd}}
      filter='facts,interfaces'
    register: result
  - name: print data
    debug: var=result

「filter」オプションで取得したい情報を記載します。残念ながら現時点では取得出来ない情報もあるようです。(configやARPテーブルなどは取得できず)

実行結果は以下の通りです。

% ansible-playbook -i hosts playbooks/get-facts.yml
PLAY [Get Device data] *********************************************************
TASK [Get data from device] ****************************************************
ok: [eos-1]
TASK [print data] **************************************************************
ok: [eos-1] => {
    "result": {
        "ansible_facts": {
            "facts": {
                "fqdn": "eos-1",
                "hostname": "eos-1",
                "interface_list": [
                    "Loopback1",
                    "Loopback2",
                    "Management1"
                ],
                "model": "CVX",
                "os_version": "4.15.7M-3284043.4157M",
                "serial_number": "",
                "uptime": 1513085,
                "vendor": "Arista"
            },
            "interfaces": {
                "Loopback1": {
                    "description": "",
                    "is_enabled": true,
                    "is_up": true,
                    "last_flapped": 1486210620.3110418,
                    "mac_address": "",
                    "speed": 0
                },
                "Loopback2": {
                    "description": "",
                    "is_enabled": true,
                    "is_up": true,
                    "last_flapped": 1486210759.9295466,
                    "mac_address": "",
                    "speed": 0
                },
                "Management1": {
                    "description": "",
                    "is_enabled": true,
                    "is_up": true,
                    "last_flapped": 1486155018.0522845,
                    "mac_address": "00:0C:29:53:21:7D",
                    "speed": 1000
                }
            }
        },
        "changed": false
    }
}
PLAY RECAP *********************************************************************
eos-1                      : ok=2    changed=0    unreachable=0    failed=0

コンフィグの追加

続いてコンフィグの追加を試してみました。

Playbookはこんな感じ。

% more playbooks/add-config.yml
---
- name: Add config
  hosts: all
  connection: local
  gather_facts: no
  tasks:
  - name: Add config
    napalm_install_config:
        hostname={{ip}}
        username={{user}}
        dev_os={{os}}
        password={{passwd}}
        config_file={{config_dir}}/{{hostname}}/config
        commit_changes=True
        replace_config=False
        diff_file={{config_dir}}/{{hostname}}/config.diff

「config」というファイルに追加する設定を記述し、「config.diff」というファイルに変更前と変更後のdiffの結果を保存するようにしています。

コンフィグ追加前のAristaのコンフィグは以下。

eos-1#sh running-config
! Command: show running-config
! device: eos-1 (CVX, EOS-4.15.7M)
!
! boot system flash:/EOS.swi
!
transceiver qsfp default-mode 4x10G
!
hostname eos-1
!
spanning-tree mode mstp
!
no aaa root
!
username test secret 5 $1$yl1ume/m$LNhZY2oO3iB0L9aCaEbGp0
!
interface Loopback1
   ip address 1.1.1.1/32
!
interface Loopback2
   ip address 2.2.2.2/32
!
interface Management1
   ip address 172.16.41.2/24
!
no ip routing
!
management api http-commands
   protocol http
   no shutdown
!
!
end

試しに、「loopback 3」を追加してみます。

% more configs/eos-1/config
interface loopback 3
ip address 3.3.3.3 255.255.255.255

実行結果は以下の通りです。

% ansible-playbook -i hosts playbooks/add-config.yml
PLAY [Add config] **************************************************************
TASK [Add config] **************************************************************
changed: [eos-1]
PLAY RECAP *********************************************************************
eos-1                      : ok=1    changed=1    unreachable=0    failed=0
eos-1#sh running-config
! Command: show running-config
! device: eos-1 (CVX, EOS-4.15.7M)
!
! boot system flash:/EOS.swi
!
transceiver qsfp default-mode 4x10G
!
hostname eos-1
!
spanning-tree mode mstp
!
no aaa root
!
username test secret 5 $1$yl1ume/m$LNhZY2oO3iB0L9aCaEbGp0
!
interface Loopback1
   ip address 1.1.1.1/32
!
interface Loopback2
   ip address 2.2.2.2/32
!
interface Loopback3
   ip address 3.3.3.3/32
!
interface Management1
   ip address 172.16.41.2/24
!
no ip routing
!
management api http-commands
   protocol http
   no shutdown
!
!
end

変更前と変更後のdiffの結果も問題なく保存されています。

% more configs/eos-1/config.diff  
@@ -18,6 +18,9 @@  
 interface Loopback2  
    ip address 2.2.2.2/32  
 !
+interface Loopback3  
+   ip address 3.3.3.3/32  
+!  
 interface Management1  
    ip address 172.16.41.2/24  
 !

まとめ

AnsibleとNAPALMを連携するためのライブラリを用意してくれているので、簡単に連携することができました。今までAnsibleを使って大量のマルチベンダ機器をお守りしていた方は、NAPALMと連携させることでAnsibleの管理も楽になるんじゃないかと思います。

今回試したコードはGitHUBに上げておきましたので、興味がある方は試してみていただければ。

itbook/ansible_napalm

Similar Posts:

AnsibleとNAPALMの連携を試してみた is a post from: ネットワークエンジニアを目指して

池谷 裕二氏 講演会メモ

$
0
0

脳科学者である前にストーリテラーだわこの人。

夕学五十講という慶應MCCが主催する講演会に、脳科学者の池谷 裕二氏が登壇するということで参加してみました。

脳はなにげに不公平 パテカトルの万脳薬
池谷裕二
朝日新聞出版 (2016–03–18)
売り上げランキング: 25,571

「未来の脳を考える」

私たちの判断や感情は無意識の世界に支配されています。つまり、無意識のカラクリを知っておくことは、よく生きることに直結します。当日は脳のしくみやヒトの感覚世界、そして近年成長著しい人工知能とヒトの脳の未来について考えたいと思います。

via:『夕学五十講』講師紹介ページ

以下参加メモです。


人類の高齢化

高年齢化に向けて、日本の未来を考えていきたい。

日本人の平均寿命は男性が80歳、女性が87歳だが、実はこの平均寿命には意味が無い。なぜなら不慮の事故や病気などで若く亡くなる人が平均寿命を下げていて、半分以上の人は平均寿命以上に生きるから。

大事なのは「中央値」。中央値とは「日本人の平均寿命まで生きられる確率」のことで、日本の女性の中央値は90歳。この数値は昔の医療技術で90年生きるということ。今の医療技術だと、2007年に生まれた子供の中央値は107歳という研究結果が出ている。

burning-platform

ソース:Human Mortality Database, University of California, Berkeley (USA) and Max Planck Institute for Demographic Research (Germany). Available at www.mortality.org

脳で脳を考えるおもしろさ

気が利くと気が利かないの差とは?

自分が気が利く人なのか、気が利かない人なのかは当人は知ることができない。なぜなら、正しいか間違っているかは「自分の常識=自分が生きている基準」だから。

脳に伝わる各種センサーについて

そもそも人が世界を見ることができるのは目があるから。でも目だけでは「見えない」。様々な実験から、実際に運動経験をしないと「見える」状態にはならない。まったく運動させなかったサルは「見え」ることができなかった。

人によって色の感じ方も違う。「赤」といっても人によって赤の色は変わる。目の色を感じるセンサーは中央にしかないため、視野の隅は色を感じることができない。でも実際には視野全体に色を感じている。それは目から伝わった情報に脳が補完しているから。景色が非常になめらかに見えるのも実際には脳が補完しているから。つまり実際に感じている色は「幻覚」なのである。

人間の目に備わっている色のセンサーは赤、緑、青の三原色。目から脳に伝わる情報はこの三原色が伝わり、脳で色を混ぜることで様々な色を再現させている。生き物の中でもっとも色のセンサーが多いのがシャコで12種類。しかし実験してみると、シャコは白黒でしか見えていないことが分かった。これは、脳の中で色を混ぜることができないため、実際には白黒でしか見えていない。

つまりこの世界は脳の解釈によってできている。

進化しすぎた脳

人の目は可視光線しか見えない。紫外線や赤外線は見ることができない。逆に鳥や虫は紫外線を見ることができる。鳥が見えて人には見えない理由は、紫外線を見るためのセンサーが人には無いため。もし紫外線や赤外線を見ることが出来れば、その情報が脳に伝わって識別することができる。つまり、脳の能力は身体の状態で制限されている。

過去の実験で磁場センサーをネズミの脳に取り付けたところ、すぐに磁場センサーを活用してエサを見つけることができた。つまり脳は進化しているが身体が追いついていない、「進化しすぎた脳」だということ。

2045年 シンギュラリティ問題

シンギュラリティ(Singularity)とは、人工知能が人間の能力を超えることで起こる出来事のこと。人類が人工知能と融合し、人類の進化が特異点(成長曲線が無限大になる点)に到達することのことで、それは2045年に起こるとレイ・カーツワイル氏が提唱している。

シンギュラリティは近い[エッセンス版] 人類が生命を超越するとき
レイ・カーツワイル
NHK出版
売り上げランキング: 5,220

そうなると、仕事を45%がAIに奪われてしまうとも言われている。

日本の労働人口の49%が人工知能やロボット等で代替可能に | 野村総合研究所(NRI)

原文(PDF)

執筆や作曲、画家などのクリエイティブな仕事は人にしか出来ないと思われがちだが、これらは既にAIを使って人以上の成果を出してきている。その他にも、「カウンセリング」「気遣い」「気が利く」ような仕事も人よりもAIの方が優れていると言われている。

ではいったい人にしかできないことは何だろうか?

今まではサルと人を比べていれば良かったが、これからはAIと人を比べる時代がやってくる。

2017年は量子コンピュータ元年

2017年は量子コンピュータ元年と言われている。量子コンピュータは組み合わせ計算が得意なので、囲碁や将棋、チェスなどの組み合わせを計算するゲームが得意。

すでに人工知能の内部の計算はもはや人間が理解出来ないほどに複雑になっている。もし、人工知能の能力を上げるために、人が人工知能をカスタマイズしようとした場合、それは改悪であり逆に性能を奪う結果になる。つまり、人はコンピュータにとってウイルスになるだろう。今後、人工知能のカスタマイズは人工知能が行う時代がやってくる。これこそがシンギュラリティ。しかしAIが人を支配する時代がくるかというとそんなことはないと思っている。なぜなら人にとってシンギュラリティが生じたら、それは困ることであり、人工知能は無用の長物になるから。

AIは本当にすごいのか?

人工知能の中でも最近注目されている「ディープラーニング」の原理は、人の脳と同じ「ニューラルネットワーク」という考え方。ニューラルネットワークは、複数の入力データを受け取って出力を行う単純な関数が、複雑に繋がりあった形をとっている。人間の脳も単純なニューロンの組み合わせによって高度な認識・思考を行っている。

人工知能という言葉だけだと「何か凄そう」と思うけど、中身は実は対したことはやっていない。

この世に脳は必要なのか?

地球上の生物の中で、脳を持っている生き物は全体の0.13%しかいない。脳を持っていると、脳を動かすために沢山のエネルギーも必要になるし、脳を持っていない生き物の方が実ははるかに快適だったりする。ではなぜ人は脳を持ったのか?

これは、「なぜ宇宙に生命が存在するのか」という話に通じる。

Similar Posts:

池谷 裕二氏 講演会メモ is a post from: ネットワークエンジニアを目指して

Amazonのジェフ・ベゾスが株主に向けたメッセージが素晴らしかったので意訳してみた。

$
0
0

Amazonのジェフ・ベゾスが株主に向けたメッセージがとても興味深かったので意訳してみました。ビジネスの成功で巨大になったAmazonが、俗に言う「大企業病」に陥らないための考え方が、シンプルに語られていてとても素晴らしいと感じました。日本の大企業とは真逆の考え方なのも、とても興味深いです。

【原文】About Amazon – 2016 Letter to Shareholders

2016 Letter to Shareholders

“Jeff, what does Day 2 look like?”

That’s a question I just got at our most recent all-hands meeting. I’ve been reminding people that it’s Day 1 for a couple of decades. I work in an Amazon building named Day 1, and when I moved buildings, I took the name with me. I spend time thinking about this topic.

“Day 2 is stasis. Followed by irrelevance. Followed by excruciating, painful decline. Followed by death. And that is why it is always Day 1.”

To be sure, this kind of decline would happen in extreme slow motion. An established company might harvest Day 2 for decades, but the final result would still come.

I’m interested in the question, how do you fend off Day 2? What are the techniques and tactics? How do you keep the vitality of Day 1, even inside a large organization?

Such a question can’t have a simple answer. There will be many elements, multiple paths, and many traps. I don’t know the whole answer, but I may know bits of it. Here’s a starter pack of essentials for Day 1 defense: customer obsession, a skeptical view of proxies, the eager adoption of external trends, and high-velocity decision making.

「ジェフ、Day 2[1]はどのように見えますか?」

先日の全社会議でこのような質問がありました。私は社員に「毎日がDay 1[2]である」と言い続けてきました。私のオフィスはどこに移転しても「Day 1」という名称だし、このテーマについていつも考えています。

Day 2とは停滞であり、存在感は失われ、苦しみと衰退が続き、やがて死がやってきます。だからこそ常に「Day 1」であり続けなければいけません。

この問題はゆっくりと会社を蝕んでいきます。Day 2になってからも何十年にもわたり、利益を出している会社もあるかもしれませんが、最終的な結果はこれから先に見えてくるでしょう。

私はこれらの質問に興味があります。

  • あなたはどのようにDay 2かわすのですか?
  • そのための戦略と戦術は何ですか?
  • どのようにDay 1の活力を、大企業でも維持するのですか?

これらの質問には簡単な答えはありません。多くの要素や複数のパス、たくさんの罠が存在するでしょう。私は全体の答えは知りませんが、断片であれば答えを知っているかもしれません。Day 1でありつづけるための4つのアイデアを紹介します。

True Customer Obsession

There are many ways to center a business. You can be competitor focused, you can be product focused, you can be technology focused, you can be business model focused, and there are more. But in my view, obsessive customer focus is by far the most protective of Day 1 vitality.

Why? There are many advantages to a customer-centric approach, but here’s the big one: customers are always beautifully, wonderfully dissatisfied, even when they report being happy and business is great. Even when they don’t yet know it, customers want something better, and your desire to delight customers will drive you to invent on their behalf. No customer ever asked Amazon to create the Prime membership program, but it sure turns out they wanted it, and I could give you many such examples.

Staying in Day 1 requires you to experiment patiently, accept failures, plant seeds, protect saplings, and double down when you see customer delight. A customer-obsessed culture best creates the conditions where all of that can happen.

ビジネスにおいて、何を一番重視するかは様々です。競争相手だったり、プロダクトだったり、テクノロジーだったり、ビジネスモデルだったり。しかし私の見解では、顧客満足への執着こそが、Day 1でありつづけるために重要なことだと考えます。

それは何故か?顧客中心のアプローチには多くのメリットがありますが、ここでは大きなポイントがあります。顧客は、常に何かに不満を持っていて、必ずしもその不満を報告するとは限りません。その不満を彼らが要求する前にAmazonプライムメンバーシッププログラムを提供する、そんな企業であるべきだと思います。

Day 1にとどまるには、辛抱強く検証し、失敗を受け入れ、種を植え、苗木を保護し、顧客の喜びをイメージすること。そうすることで、「顧客満足への執着」は育まれます。

Resist Proxies

As companies get larger and more complex, there’s a tendency to manage to proxies. This comes in many shapes and sizes, and it’s dangerous, subtle, and very Day 2.

A common example is process as proxy. Good process serves you so you can serve customers. But if you’re not watchful, the process can become the thing. This can happen very easily in large organizations. The process becomes the proxy for the result you want. You stop looking at outcomes and just make sure you’re doing the process right. Gulp. It’s not that rare to hear a junior leader defend a bad outcome with something like, “Well, we followed the process.” A more experienced leader will use it as an opportunity to investigate and improve the process. The process is not the thing. It’s always worth asking, do we own the process or does the process own us? In a Day 2 company, you might find it’s the second.

Another example: market research and customer surveys can become proxies for customers – something that’s especially dangerous when you’re inventing and designing products. “Fifty-five percent of beta testers report being satisfied with this feature. That is up from 47% in the first survey.” That’s hard to interpret and could unintentionally mislead.

Good inventors and designers deeply understand their customer. They spend tremendous energy developing that intuition. They study and understand many anecdotes rather than only the averages you’ll find on surveys. They live with the design.

I’m not against beta testing or surveys. But you, the product or service owner, must understand the customer, have a vision, and love the offering. Then, beta testing and research can help you find your blind spots. A remarkable customer experience starts with heart, intuition, curiosity, play, guts, taste. You won’t find any of it in a survey.

企業はビジネスが大きく、複雑になるにつれて、ルールやプロセスを作ります。しかしこの流れは微妙で危険だし、Day 2に近付く行為となります。

それは、ルールやプロセスを作ることが目的になってしまうからです。一般的にルールやプロセスは顧客のためになります。しかし大企業では本来の目的をはき違えてしまいます。ルールやプロセスは本来の目的を達成するための手段でしかありません。若いリーダーが失敗した時に自分を守るためにプロセスを使うこともあるでしょう。プロセスは目的ではありません。私たちはプロセスを所有しているのでしょうか?それともプロセスが私たちを所有しているのでしょうか?

もう一つの例として、市場調査や顧客調査の結果がプロセスになってしまう可能性もあります。特に製品を開発するときに注意が必要です。ベータテスターの結果が、55%がこの機能に満足していると報告があったとしても、この数字は単なる指標でしかなく、意図しない誤解を招く可能性があります。

Embrace External Trends

The outside world can push you into Day 2 if you won’t or can’t embrace powerful trends quickly. If you fight them, you’re probably fighting the future. Embrace them and you have a tailwind.

These big trends are not that hard to spot (they get talked and written about a lot), but they can be strangely hard for large organizations to embrace. We’re in the middle of an obvious one right now: machine learning and artificial intelligence.

Over the past decades computers have broadly automated tasks that programmers could describe with clear rules and algorithms. Modern machine learning techniques now allow us to do the same for tasks where describing the precise rules is much harder.

At Amazon, we’ve been engaged in the practical application of machine learning for many years now. Some of this work is highly visible: our autonomous Prime Air delivery drones; the Amazon Go convenience store that uses machine vision to eliminate checkout lines; and Alexa,1 our cloud-based AI assistant. (We still struggle to keep Echo in stock, despite our best efforts. A high-quality problem, but a problem. We’re working on it.)

But much of what we do with machine learning happens beneath the surface. Machine learning drives our algorithms for demand forecasting, product search ranking, product and deals recommendations, merchandising placements, fraud detection, translations, and much more. Though less visible, much of the impact of machine learning will be of this type – quietly but meaningfully improving core operations.

Inside AWS, we’re excited to lower the costs and barriers to machine learning and AI so organizations of all sizes can take advantage of these advanced techniques.

Using our pre-packaged versions of popular deep learning frameworks running on P2 compute instances (optimized for this workload), customers are already developing powerful systems ranging everywhere from early disease detection to increasing crop yields. And we’ve also made Amazon’s higher level services available in a convenient form. Amazon Lex (what’s inside Alexa), Amazon Polly, and Amazon Rekognition remove the heavy lifting from natural language understanding, speech generation, and image analysis. They can be accessed with simple API calls – no machine learning expertise required. Watch this space. Much more to come.

外部の大きな変化を素早く受け入れることができない場合、すぐにDay 2の企業になってしまいます。それを防ぐには未来と戦っていかなければいけません。

これらの大きな変化を見つけることは難しいことではありませんが、大規模な組織がその変化に対応することは難しいです。最近の大きな変化として、機械学習と人工知能があります。

過去数十年にわたり、コンピュータはプログラマが明確なルールとアルゴリズムを記述して自動化されたタスクを自動していました。近年の機械学習では、我々が正確なルールを記述することができないようなタスクについても、機械学習を使って同じようなことができるようになりました。

Amazonでは、長年機械学習の実用化に取り組んできました。その成果の一部として、配達用ドローンやAmazon go、Alexa、クラウドベースのAIアシスタントなどがあります。

しかし、機械学習で行うことの多くは水面下で動作しています。需要予測や製品検索ランキング、おすすめ商品の紹介、不正検出、翻訳などのアルゴリズムで使用されています。目には見えませんが、機械学習の影響の多くは、中核機能の改善に大きく役立っています。

AWSでは機械学習やAIのコストや障壁を低くすることで、あらゆる組織がこれらの高度な技術を活用できるようになりました。

コンピュータインスタンス上で実行されるディープラーニング・フレームワークをあらかじめパッケージ化しておくことで、顧客は疾病検出から作物収量の増加などのあらゆるシステム開発に利用することができます。Amazon LexやAmazon Polly、Amazon Rekognitionは、自然言語の理解、音声生成、画像解析などの開発コストを低減することができます。機械学習の専門知識は必要ありません。簡単なAPIの呼び出しでアクセスできます。

High-Velocity Decision Making

Day 2 companies make high-quality decisions, but they make high-quality decisions slowly. To keep the energy and dynamism of Day 1, you have to somehow make high-quality, high-velocity decisions. Easy for start-ups and very challenging for large organizations. The senior team at Amazon is determined to keep our decision-making velocity high. Speed matters in business – plus a high-velocity decision making environment is more fun too. We don’t know all the answers, but here are some thoughts.

First, never use a one-size-fits-all decision-making process. Many decisions are reversible, two-way doors. Those decisions can use a light-weight process. For those, so what if you’re wrong? I wrote about this in more detail in last year’s letter.

Second, most decisions should probably be made with somewhere around 70% of the information you wish you had. If you wait for 90%, in most cases, you’re probably being slow. Plus, either way, you need to be good at quickly recognizing and correcting bad decisions. If you’re good at course correcting, being wrong may be less costly than you think, whereas being slow is going to be expensive for sure.

Third, use the phrase “disagree and commit.” This phrase will save a lot of time. If you have conviction on a particular direction even though there’s no consensus, it’s helpful to say, “Look, I know we disagree on this but will you gamble with me on it? Disagree and commit?” By the time you’re at this point, no one can know the answer for sure, and you’ll probably get a quick yes.

This isn’t one way. If you’re the boss, you should do this too. I disagree and commit all the time. We recently greenlit a particular Amazon Studios original. I told the team my view: debatable whether it would be interesting enough, complicated to produce, the business terms aren’t that good, and we have lots of other opportunities. They had a completely different opinion and wanted to go ahead. I wrote back right away with “I disagree and commit and hope it becomes the most watched thing we’ve ever made.” Consider how much slower this decision cycle would have been if the team had actually had to convince me rather than simply get my commitment.

Note what this example is not: it’s not me thinking to myself “well, these guys are wrong and missing the point, but this isn’t worth me chasing.” It’s a genuine disagreement of opinion, a candid expression of my view, a chance for the team to weigh my view, and a quick, sincere commitment to go their way. And given that this team has already brought home 11 Emmys, 6 Golden Globes, and 3 Oscars, I’m just glad they let me in the room at all!

Fourth, recognize true misalignment issues early and escalate them immediately. Sometimes teams have different objectives and fundamentally different views. They are not aligned. No amount of discussion, no number of meetings will resolve that deep misalignment. Without escalation, the default dispute resolution mechanism for this scenario is exhaustion. Whoever has more stamina carries the decision.

I’ve seen many examples of sincere misalignment at Amazon over the years. When we decided to invite third party sellers to compete directly against us on our own product detail pages – that was a big one. Many smart, well-intentioned Amazonians were simply not at all aligned with the direction. The big decision set up hundreds of smaller decisions, many of which needed to be escalated to the senior team.

“You’ve worn me down” is an awful decision-making process. It’s slow and de-energizing. Go for quick escalation instead – it’s better.

So, have you settled only for decision quality, or are you mindful of decision velocity too? Are the world’s trends tailwinds for you? Are you falling prey to proxies, or do they serve you? And most important of all, are you delighting customers? We can have the scope and capabilities of a large company and the spirit and heart of a small one. But we have to choose it.

A huge thank you to each and every customer for allowing us to serve you, to our shareowners for your support, and to Amazonians everywhere for your hard work, your ingenuity, and your passion.

As always, I attach a copy of our original 1997 letter. It remains Day 1.

Sincerely,

Jeff

Day 2の企業であっても、質の高い決断をしますがそれは時間をかけて行います。Day 1の企業であれば、エネルギーとダイナミズムを維持するために、高品質で高速な意思決定を行う必要があります。それは大企業な組織であるほど困難なことです。Amazonのシニアチームは、意思決定をスピードを常に意識し保つ努力をしています。ビジネスにおいて、質の高い決断を素早くする環境は楽しいものです。そのためには以下のようなアイデアがあります。

まず、決してすべての意思決定プロセスを踏むことはやめましょう。決断を行う場合は、できるだけ軽量なプロセスを踏むようにします。それでもし間違った決断をしたらどうするか?それは、昨年のレターで詳しく書いています。

二つ目として、ほとんどの決断に必要な情報量は70%程度で十分です。90%の情報が集まるまで決断を先延ばしするには遅すぎます。また、どちらの決断をするにしても、間違った決断をしたことが分かったら、素直に認めて軌道修正することが重要です。この軌道修正は早ければ早いほどコストがかかりません。

三つ目として、「同意は出来ないが全面的にコミットする」ことが多くの時間とコストを節約することになります。コンセンサスがなくてもその決断に確信がある場合は、「私はこれには同意しませんが、私と一緒に賭けてみませんか?disagree and commit?」と言える文化です。この時点で誰も答えを知らないですが、おそらくみんな「はい」と答えるでしょう。

あなたが上司であれば「反対してコミットする」ことも行うべきです。私たちは最近、Amazon Studiosというプロジェクトを進めています。私はチームにプロジェクトを進めるための見解を伝えています。それは、それが面白いかどうか、生産するのが複雑かどうか、ビジネスとして成り立つかどうか。そこにはもちろん議論の余地があります。私はすぐに「私は同意していないが、そのプロジェクトが今までに見た中で最も注目されることを願っています」と伝えました。もしチームが私のコミットメントを得るのではなく、私を納得させなければならないとしたら、どれほどの時間がかかったかを想像してみてください。

私自身、「これらの人はポイントを見誤っていて、追いかける価値はない」とは考えていません。チームとして成功するためにとった誠実な行動の結果です。その結果、チームは11のエミー賞、6つのゴールデングローブ賞、3つのアカデミー賞を持ち帰ることができました。

四つ目として、認識違いの問題を早期に認識し、直ちにエスカレートさせることです。時にはチームの目的が異なり、根本的に見解が違う場合があります。議論の量やミーティングの数は解決にはなりません。エスカレーションなしでは、解決に至ることはできません。

私は何年もの間、Amazonでの間違った決断を見てきました。私たち自身の製品詳細ページ上で、私たちに対して直接競合するサードパーティの売り手を招待することを決定したことは大きな決断でした。多くのAmazoniansにとっては望んだことではありませんでした。大きな決定は何百もの小さな決定から作られました。その多くはシニアチームにエスカレートする必要がありました。

あなたは意思決定の質だけに気を配っているのでしょうか?それとも意思決定の速度にも気を配っていますか?世界のトレンドはあなたにとって追い風でしょうか?あなたはルールやプロセスにこだわっていますか?それともルールやプロセスを手段として使っていますか?そして最も重要なのは、お客様は喜んでいますか?私たちは大企業としての能力と、小さな会社の精神と心を持つことができます。

皆様のご協力と株主の皆様へのサポート、そしてAmazonの皆様の努力、独創性、情熱のために、お客様一人一人に大きな感謝の意を表します。

いつもと変わらず、1997年時のレターを添付します。今でもDay 1のままです。

Sincerely,

Jeff


  1. Day 2とは、常にベンチャーであり続けたいという意思が込められています。  ↩

  2. 大企業病にかかった企業を意味しています。  ↩


Similar Posts:

Amazonのジェフ・ベゾスが株主に向けたメッセージが素晴らしかったので意訳してみた。 is a post from: ネットワークエンジニアを目指して
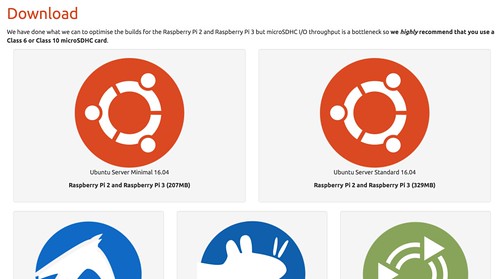
あるべきキックオフミーティングの姿に向けて事前に検討しなければいけないことリスト

$
0
0

pexels-photo-374384

プロジェクトやワーキンググループの開始時や、会社組織の期初などに行われるキックオフミーティング。無駄に冗長だったり、内容の無いことを延々と聞かされた経験は無いでしょうか?

そもそもキックオフミーティングとは?

「キックオフ」とはその名の通り、サッカーの試合開始を意味するもの。つまりプロジェクトなどを始動させるために行うミーティングのことで、プロジェクトやビジネスを成功へ導くために、メンバーと使命感や一体感を共有する場のことです。

そのためキックオフミーティングで、プロジェクトの概要やワーキンググループの進め方、今年度の売り上げ目標などを説明するだけでは、本来の目的を達成したとは言えません。メンバーの不安を解消したり、モチベーションを強化させたり、ゴールを共有するなど、チームの一体感を醸成させることが目的です。

そこで「あるべきキックオフミーティングの姿」に向けて、「事前に検討しなければいけないことリスト」を作成してみました。

これらの質問や課題を事前に検討し、アウトプットした答えをキックオフ資料に落とし込むことで、「あるべきキックオフミーティング」に近づけることを目的としています。

soccer-goal-keeper-player-kick-159516

事前に検討しなければいけないことリスト

  • 我々はなぜここにいるのか?
  • 我々はどこに向かうのか?
  • やるべきではないことは?
  • 巻き込むべき人は?
  • ゴール到達のための策は?
  • ゴール到達を拒む、夜も眠れない問題は?
  • ゴールに到達するための期間は?
  • 何を諦めるのか?

※これらのリストはβ版で、常に改善するために追記/修正をしています。

我々はなぜここにいるのか?

我々チームあるいは部門がなぜ存在しているのか?誰になにを提供するために存在するのか?を改めて確認します。我々の立ち位置を確認することで、組織の目的が明確になります。検討する上で「顧客」、「会社」そして「競合」の3Cの視点を考慮するようにしましょう。

顧客の規模やニーズを考慮しつつ、自社の強み/弱みやビジョン/ミッションに沿った内容になっているかどうか、必要によって競合に打ち勝つための差別化要素があるかどうかも考慮にいれます。

我々はどこに向かうのか?

組織が存在する意味を考えた後に、我々組織はどこに向かうべきか?どこを目指すのか?を確認します。これは組織のメンバー全員が誰一人迷うことなくゴールへと向かうための道しるべを指し示す必要があるためです。

「どう変わりたいのか」を漠然とではなく、具体的に落とし込むようにします。

やるべきではないことは?

ゴールに向かうために「やるべきこと」を検討することは多いですが、「やるべきではないこと」を決めておくことはとても大事です。やるべきではないことを明確にしておくことで、メンバー内で目指すべき方向をはっきりと共有することができます。

巻き込むべき人は?

プロジェクトや組織のメンバーを決めることができるなら、引き入れたいメンバーを検討します。既にメンバーが決まっているのなら、それ以外の巻き込みたい関係者を検討しておきます。プロジェクトが進んでから巻き込んでも、巻き込まれた方も迷惑するかもしれないので、最初から巻き込んでおくようにします。

ゴール到達のための策は?

ゴールに到達するために実施する具体的なアクションを検討します。具体的なアクションは「6W1H」で考えると思考がすっきりします。

「何を(What)」「いつまでに(When)」「誰が(Who)」「誰と(Whom)」「どこで(Where)」「なぜ(Why)」「どのように(How)」

ゴール到達を拒む、夜も眠れない問題は?

ゴール到達を拒むかもしれないリスクを書き出しておきます。プロジェクトが失敗してから反省会をすることも大事ですが、事前にリスクを洗い出し、メンバーと共有してリスクに備えるようにします。

ゴールに到達するための期間は?

全体のスケジュール感を全メンバーに共有するために、スタートからゴールまでを見通せる「ざっくりスケジュール」を作成します。

何を諦めるのか?

やりたいこと全部できるなら言うことなしですが、スケジュールやコストの兼ね合いで諦めなければいけないことがでてきます。「このプロジェクトではなにを諦めるのか?」を始めに明確にしておくことも大事です。

pexels-photo-90454 (1)

さいごに

繰り返しますが、このリストは永遠にβ版です。今後も定期的にリストを見直し、追記や変更を繰り返し、常に最善のリストにすることを目指しています。

参考文献

アジャイルサムライ−達人開発者への道−
Jonathan Rasmusson
オーム社
売り上げランキング: 2,721
HIGH OUTPUT MANAGEMENT(ハイアウトプット マネジメント) 人を育て、成果を最大にするマネジメント
アンドリュー・S・グローブ
日経BP社
売り上げランキング: 257
チームが機能するとはどういうことか――「学習力」と「実行力」を高める実践アプローチ
エイミー・C・エドモンドソン Amy C. Edmondson
英治出版
売り上げランキング: 10,144

Similar Posts:

あるべきキックオフミーティングの姿に向けて事前に検討しなければいけないことリスト is a post from: ネットワークエンジニアを目指して

テクノロジー幹部が本棚に置くべき13冊の書籍

$
0
0

pexels-photo-92323

フォーブスに「13 Books Technology Executives Should Have On Their Shelves(テクノロジー幹部が本棚に置くべき13冊の書籍)」という記事がありましたので紹介します。

Continuing education is important, and while there are a lot of trade journals and keynote speakers to help highlight the latest trends, they’re not the only source of perspective.

via:13 Books Technology Executives Should Have On Their Shelves


銀河ヒッチハイク・ガイド(ダグラス・アダムス著)

銀河ヒッチハイク・ガイド (河出文庫)
ダグラス・アダムス
河出書房新社
売り上げランキング: 11,119

ダグラス・アダムスの常識にとらわれない知恵の最大のコレクションである「銀河ヒッチハイク・ガイド」を手元に置いている。この本にはテクノロジーとイノベーションのついて学んだ最も重要な教訓が含まれている。それは、あなたが正しい質問をしていない場合、解決策は何も意味がないということだ。

人月の神話(フレデリック・フィリップス・ブルックス著)

人月の神話【新装版】
人月の神話【新装版】
posted with amazlet at 17.05.29
Jr FrederickP.Brooks
丸善出版
売り上げランキング: 16,687

40年以上前に出版されたほとんどの技術書は古くて役に立たなくなる。しかし、フレッド・ブルックスの個展で開発チームを管理するための教訓は、「人月の神話」がその1つではないことを保証する。本書では、IBMの教訓を詳細に説明し、ソフトウェアチームを管理する技術幹部が何十年もコミットしてきた多くの一般的な間違いを回避するのに役立つ。

ワン・シング 一点集中がもたらす驚きの効果(ゲアリー・ケラー, ジェイ・パパザン著)

ワン・シング 一点集中がもたらす驚きの効果
ゲアリー・ケラー Gary Keller ジェイ・パパザン Jay Papasan
SBクリエイティブ
売り上げランキング: 16,805

2017年には、電子メール、テキスト、ソーシャルメディアなど、コミュニケーションの余地がある。経営陣として、その混乱は10倍である。ゲイリー・ケラーとジェイ・パパサンの著書、「ワン・シング 一点集中がもたらす驚きの効果」は、達成し続けるために焦点を当てる方法を文書化しています。 チームを実用的な目標に合わせることが私たちの仕事です。

発想の法則―物事はなぜうまくいかないか(ジョン・ゴール著)

SYSTEMANTICS
SYSTEMANTICS
posted with amazlet at 17.05.29
John gall
Pocket
発想の法則―物事はなぜうまくいかないか (1978年)
ジョン・ゴール
ダイヤモンド社
売り上げランキング: 1,316,879

70年代からのシステムの格言の要約で、この皮肉まじりのシステム理論の批判は逆説的ではあるが、複雑なシステムを構築するという観点で洞察力のある見通しを提供する。 テクノロジー、テクノロジー組織、さらにはビジネスに携わる人々にとって、ジョン・ゴールの本書は多くの人にとって真実であると感じる。

ザ・ゴール ― 企業の究極の目的とは何か(エリヤフ・ゴールドラット著)

ザ・ゴール ― 企業の究極の目的とは何か
エリヤフ・ゴールドラット
ダイヤモンド社
売り上げランキング: 748

厳密には技術書ではないが、プロセス最適化に関する教訓は時代を超越しており、新しい領域にも簡単に適用できる。エリヤフ・ゴールドラットの本書は、新しい形態のいくつかの基本的プロセス技術を解説する非常に素晴らしい仕事をしている。この小説は、多くのMBAプログラムで正当な理由で読む必要がある。深いレベルですでにこれらのことを理解している人々でさえ、この書籍に感謝するだろう。

Elon Musk: Elon Musk’s Best Lessons For Life, Business, Success And Entrepreneurship (Andrew Knight著)

Elon Musk’s Best Lessons for Life, Business, Success and Entrepreneurship
Andrew Knight
Createspace Independent Publishing Platform

本書は素晴らしい読書であり、日々の技術リーダーシップの責任の中で実践的なアドバイスを提供する。

How to Create a Mind: The Secret of Human Thought Revealed(レイ・カーツワイル著)

How to Create a Mind: The Secret of Human Thought Revealed
Duckworth Overlook (2013–02–28)

本書は、技術の世界に携わる皆が所有すべき本である。脳のリバースエンジニアリングに始まり、アルゴリズムの深い理解と、この知識がどのように機械知能の創造に貢献するかを掘り下げる。本書は、技術業界が目指す人工知能を網羅しており、必須としている。

Hacking Innovation: The New Growth Model From The Sinister World Of Hackers(ジョシュ リンクナー著)

業界を問わず、あらゆるテクノロジー部門の幹部は、本書を読むべき。テクノロジー幹部として、私たちはITの世界にかなり精通していると確信しているが、ビジネス上の問題を解決する方法についてもっと創造的に考えることができる。本書は、ハッキング・マインドセットの肯定的な特性を活用して、貴社の意味のある結果を導く方法を教えてくれる。

誰のためのデザイン? – 認知科学者のデザイン原論(ドナルド・ノーマン著)

誰のためのデザイン? 増補・改訂版 ―認知科学者のデザイン原論
D. A. ノーマン
新曜社
売り上げランキング: 15,326

ドアノブや蛇口のような簡単な例を使用して、本書はユーザーの採用にとってデザインが重要な理由を具体例を使って示している。直感的なデザインとは、技術者以外の人達のための製品を作成する際に、あらゆる技術担当者が念頭に置いておくべきことである。

Enterprise Architecture As Strategy: Creating a Foundation For Business Execution By Jeanne W. Ross, Peter Weill(David Robertson著)

本書は、ビジネスの理解を通じてテクノロジー部門をどのように運営するかについて書かれた優れた青写真である。ビジネスの運用モデルの合意を得て、コア・ダイアグラムを開発することで、組織内の相手との会話を変えることができる。

セキュリティはなぜやぶられたのか(ブルース・シュナイアー著)

セキュリティはなぜやぶられたのか
ブルース・シュナイアー
日経BP社
売り上げランキング: 338,772

本書は、セキュリティの優先順位、避けるべき落とし穴、そして最も重要なのは、スタンドアローンのセキュリティソリューションとしてテクノロジーに過度に依存しているという健全な懐疑論に関すて著者の視点からの語っている。9/11以降の世界では、テクノロジー幹部にとってこのコアの問題について、冷静で実用的な議論を提供している。

Radical Candor: Be A Kick-Ass Boss Without Losing Your Humanity(Kim Scott著)

Radical Candor
Radical Candor
posted with amazlet at 17.05.29
Kim Scott Malone
Macmillan
売り上げランキング: 25,431

あなたがKim Scottの新しい本を読んでいないなら、あなたは逃している! スコットは、Google、Apple、Twitterなどの大手テクノロジー企業の逸話や教訓を紹介している。私は本書からより良い上司になる方法と私たちの全チームがより深いレベルでつながる手助けをする方法について多くのことを学んだ。

WHYから始めよ!- インスパイア型リーダーはここが違う(サイモン・シネック著)

WHYから始めよ!―インスパイア型リーダーはここが違う
サイモン・シネック
日本経済新聞出版社
売り上げランキング: 1,476

本書は必読の本である。技術者として、私たちは本当に理由を理解するのではなく、問題を解決する方法を考えている。シネックは、歴史の中で最大の影響を与えた人や革新者が、メッセージ、動き、製品の根本的な目的を最初に熟考したと主張している。私たちは同じことをするように警告しています。

Similar Posts:

テクノロジー幹部が本棚に置くべき13冊の書籍 is a post from: ネットワークエンジニアを目指して


Duck DNSというダイナミックDNSサービスを使ってみた

$
0
0

自宅サーバーにドメインを割り当てる必要があり、「Duck DNS」というダイナミックDNSを利用してみたので、利用方法や使用感をまとめておきます。

Duck DNS 2017-05-29 15-14-37


Duck DNS

Duck DNSはフリーで使えるダイナミックDNSサービスです。固定IPが無くても、定期的にサーバー側からIPを確認する事で 特定のホスト名とサーバーのIPアドレスを結びつけてアクセス出来るようにします。

Duck DNSでは、複数のIP確認方法が提供されていますので、お好きな方法でIPの更新をすることができます。

自宅サーバーで半年以上運用していますが、特に繋がらない等の問題も起きていません。

登録方法

アカウント作成

まずDuck DNSサービスを使用するために、アカウントを作成します。

ログインはアカウントトップページ上部に、FacebookやTwitter、Googleのアカウントのリンクがありますので、お好きな方法でログインします。

Duck DNS 2017-05-29 15-30-48

ドメインの取得

取得したいドメインを入力欄に入力し、「add domain」を押します。

Duck DNS 2017-05-29 15-26-37

既に他のユーザーが取得済のドメインだった場合、以下のようにエラーメッセージが表示されます。

Duck DNS 2017-05-29 15-45-59

無事に取得できると、下の部分に取得したドメインと取得したIPアドレスが表示されます。

Duck DNS 2017-05-29 15-47-39

以上でドメインが取得できました。

IPアドレス変更通知固定

固定IPではなく、プロバイダから払い出されたIPを使っている場合、ルータの再起動等でIPアドレスが変わる可能性があります。その時でも、ドメイン宛のアクセスを自宅サーバーに向けさせるために定期的にIPアドレスの変更通知をDuck DNS側に伝える必要があります。

IPアドレスの変更を通知させる方法は、サイト上部にある「Install」をクリックします。

Duck DNS - install 2017-05-29 18-32-29

Installをクリックすると、下部にそれぞれのプラットフォームごとにIP変更通知の方法がでてきます。今回はLinuxのCRONを使って変更通知を行ってみます。

「linux cron」を選択して、事前に設定したドメインを選択すると、作業手順が表示されます。

Duck DNS - install 2017-05-29 18-36-33

基本的にこの作業手順に沿って実施していきます。まずは以下のコマンドを実行します。

ps -ef | grep cr[o]n

何も出力がない場合は、CRONがインストールされていないので、別途CRONをインストールします。

続いて以下のコマンドを実行して、curlがインストールされているかを確認します。

curl

CRONと同様に何も出力されない場合は、curlをインストールします。

続いて以下のコマンドを実行して、「duckdns」というディレクトリを作成し、その中に「duck.sh」というファイルを作成します。

mkdir duckdns
cd duckdns
vi duck.sh

「duck.sh」に以下のコマンドを記述します。

echo url="https://www.duckdns.org/update?domains=hogehogehoge&token=xxxxxxxxxx&ip=" | curl -k -o ~/duckdns/duck.log -K -

以下コマンドでファイルに実行権限を与えます。

chmod 700 duck.sh

続いてCRON設定を行います。

crontab -e

*/5 * * * * ~/duckdns/duck.sh >/dev/null 2>&1

以上でCRON設定は終了です。

試しに、作成した「duck.sh」を実行してみます。

./duck.sh

実行すると同じディレクトリに「duck.log」というファイルが生成されます。

cat duck.log

ファイルに「OK」と書かれていれば問題なく動作しています。

Similar Posts:

Duck DNSというダイナミックDNSサービスを使ってみた is a post from: ネットワークエンジニアを目指して

講演会メモ「人と組織に求められる生産性」伊賀 泰代氏

$
0
0

夕学五十講に伊賀 泰代氏が登壇するということで参加してきました。

講演のテーマは「人と組織に求められる生産性」というテーマで、伊賀氏の著書の内容を中心に話されるらしいが残念ながらその著書は未読。

生産性―――マッキンゼーが組織と人材に求め続けるもの
伊賀 泰代
ダイヤモンド社
売り上げランキング: 217

以下参加メモです。


「生産性」に対する勘違い

1990年代の「安い国」の稼ぎ方とその成功体験をまだ引きずっている。すでに日本は先進国であり、かつての日本ではないことに気付かない。

売上が大きいことが一番という感覚にとらわれている。「質より量」ではなく「量より質」という転換ができない。

生産性 = コスト削減」という思い込みから脱出できない。

生産性を上げることは、量を増やすのではなく質を上げることが重要なのに、政府の施策は量にばかりフォーカスしている。政府の取り組みとして挙げられる「1億総活躍」や「働き方改革」はすべて量にフォーカスしている。

生産性とは

生産性は「生産性 = 成果 / 投入資源」という式で成り立つが、政府の施策はすべて投入資源(量)にばかりフォーカスしている。(1億総活躍は分母を増やす施策、働き方改革は分母を減らす施策)

そうではなくて、「成果」を上げるには?という議論が外されている。

例えば、企業が実施する「会議時間の短縮対策」も、「会議時間は1時間以内にすること」など、投入時間量のコントロールにしかフォーカスしていないことが多い。

本来の「会議時間の短縮対策」は会議時間を制限するのではなく、「意思決定の生産性の向上」にフォーカスするべき。参加者が会議前に、その会議の趣旨(意思決定なのか、共有なのか、報告なのか)を考え、その会議の成果は何なのか?を事前に把握することが重要。

生産性を上げるには

生産性の上げるには「実践」しかない。生産性を上げるためのセミナーや講演などでは意識改革はできない。日々の業務で生産性が重要だと感じることでしか変わらない。

1つの方法として「振り返り」を行う方法がある。先週の1週間のスケジュールをプリントし、1日を2〜3時間の単位に分けで「この中で生産性が高かった項目はどれか?低かった項目はどれか?」を色分けしてみる。

このように見える化して、チーム内で共有するだけで生産性が上がる。

また、会議の振り返りとして、会議終了後に「自分にとって、その会議は意味があったか?」を色分けして共有する。そうするだけで生産性は自然と上がる。

生産性の問題は経営者の問題。経営判断は生産性を上げているかで判断する。

頑張っていることを褒めるのではなく、生産性を褒める。さらに、「このアウトプットを今より工数を2割減らす案」を考えさせる。生産性を上げるには、管理者の指導が重要。

1か月あるいは1年で仕事を振り替えさせることも重要。会社の利益に貢献していない、生産性の低い仕事を3つピックアップさせる。管理者が必要ないを思えば、止めさせるべき。

今週手がけた仕事を生産性の高い順に上げさせることも効果的。上げさせるだけで良い。上げさせるという部下に考えさせることが目的。

成長とは

成長の定義は「頑張って勉強した」ではなく、「生産性の高さ」で定義したい。日本は「Hard Work」を評価しがちだが、「High Productivity」を評価すべき。

成長は「成長 = 今年の生産性 / 去年の生産性」で成り立つ。生産性を高めるためには?という問いから必要なスキルを学ぶべき。そうすれば無駄な勉強をしなくてすむ。

経営者として

残業が減ってきて、売上が上がったら、それは生産性が上がったということ。

そうであれば、その成果は労働者に還元すべき。生産性が上がっても労働者の収入が下がるのはあってはならない。生産性が上がれば、労働者の収入も上がるべき。

このような体制を作ることが経営者の役目。

組織力とは

「リーダーシップ」と「生産性」この2つが組織力の源泉。「リーダーシップ」と「生産性」を上げていくことが、組織力を上げていくということ。

採用基準
採用基準
posted with amazlet at 17.06.05
伊賀 泰代
ダイヤモンド社
売り上げランキング: 497

Similar Posts:

講演会メモ「人と組織に求められる生産性」伊賀 泰代氏 is a post from: ネットワークエンジニアを目指して

インターネット・トラフィックパターンの大きな変化

$
0
0

Key indicators for digital transformation - Cisco 2017-06-18 12-16-32

久しぶりにCisco VNI(Visual Networking Index)を見ていたらインターネットのトラフィックパターンに大きな変化を感じたので書いておく。


トラフィックはエッジ内に収まる

かつてのインターネット・トラフィックは複数のピア間を通り、全世界に流れていました。特にトラフィックの大半はビデオトラフィックで、VNIでも2021年にはトラフィック全体の80%がビデオトラフィックになると予測しています。

今後ビデオトラフィックはCDN(content delivery network)の活用によって、ロングホールを通過するトラフィックは減ってくるのではないかと思っています

VNIの調査でも、CDNの普及拡大とトラフィックパターンの変化を以下の様に予測しています。

  • 2021年には世界のインターネットトラフィックの35%が、メトロ・トゥ・メトロに流れる
  • 2016年ではインターネットトラフィックの52%でCDNが使用されているが、2021年には71%に増加する

bus03

CDNを活用することで、サービス提供者はサーバー側の負荷を減らすことができますし、ユーザーはサービスへのアクセスが早くなるという、どちらにとってもメリットがあるサービスですので、今後も成長していく市場だと思います。

ビジネス向けトラフィックの増加

VNIでは全世界のビジネス向けIPトラフィックが、2016年から2021年にかえて21%増加すると予測しています。

bus

すでに多くの企業がインターネット・トラフィックの送受信を行っていますが、今後の増加はおそらくクラウドサービスの利用増加とテレビ会議の増加によるビデオトラフィックの増加が原因ではないかと思います。

VNIレポートを見ると2016年から2021年にかけて、固定環境で20%、モバイル環境で41%、IP WAN環境で10%の増加という予測です。

bus02

ここで注目したいデータはIP WANトラフィックの内訳です。VNIによると、2016年ではIP WANトラフィック全体の6%がSD-WANが占めているが、2021年にはIP WANトラフィックの25%がSD-WANトラフィックが占めるという記載がありました。

SD-WANトラフィックは、2016年から2021年にかけて6倍に成長し、年間成長率は44%になると予測しています。

最近CiscoはSD-WAN関連の企業を積極的に買収しています。クラウドベースのSD-WANベンダー「Viptela」を6億1000万ドルで買収しましたし、その他にも自社で開発しているIntelligent WAN(IWAN)Cisco MerakiもSD-WANのカテゴリに含まれます。

Similar Posts:

インターネット・トラフィックパターンの大きな変化 is a post from: ネットワークエンジニアを目指して

CiscoのVirlを試してみた

$
0
0

随分前からサービスしていたのですが、なかなか触る機会がなかったVirlを試してみました。

Cisco Virlとは、Ciscoルータを仮想的に構築することができるシミュレーション・ソフトウェアです。

Virlは実際のネットワーク機器のソースコードを多く使用しているらしいので、実機を使わずに検証するという使い方もできそうです。

動作するOSとしては、IOS、IOS-XE、IOS-XR、NX-OSと一通りのOSが動作する模様。

Virlはオンプレ環境で構築することも可能ですが、CiscoのサイトでdCloudというサービスの1つとしてリリースもしています。今回はこのdCloud(要Ciscoアカウント)上でVirlを使ってみようと思います。

CiscoのVIRLを試してみたを読む。

Similar Posts:

CiscoのVirlを試してみた is a post from: ネットワークエンジニアを目指して

AnsibleとNAPALMの連携を試してみた

$
0
0

前回マルチベンダーなネットワーク機器を制御出来るPythonライブラリ「NAPALM」を試してみたので、今回はAnsibleとNAPALMの連携を試してみました。

検証環境

検証環境は以下の通り

NAPALM

% pip show napalm
Name: napalm
Version: 1.1.0
Summary: Network Automation and Programmability Abstraction Layer with Multivendor support
Home-page: https://github.com/napalm-automation/napalm
Author: David Barroso
Author-email: dbarrosop@dravetech.com
License: UNKNOWN
Location: /Users/itbook/.pyenv/versions/2.7.8/lib/python2.7/site-packages
Requires: napalm-iosxr, napalm-ibm, napalm-pluribus, napalm-eos, napalm-nxos, napalm-fortios, napalm-panos, napalm-junos, napalm-base, napalm-ios

Ansible

% ansible --version
ansible 2.1.0.0
  config file =
  configured module search path = Default w/o overrides

AnsibleとNAPALMを連携するライブラリ

以下のライブラリを使っています。

napalm-automation/napalm-ansible

Arista

eos-1#show version
Arista CVX
Hardware version:
Serial number:
System MAC address:  000c.29f1.b416

Software image version: 4.15.7M
Architecture:           i386
Internal build version: 4.15.7M-3284043.4157M
Internal build ID:      b0b0dff8-c9ca-40cc-a625-7fd3c8c76ebd

Uptime:                 15 hours and 51 minutes
Total memory:           2513796 kB
Free memory:            174616 kB

デバイス情報を取得

Playbookはこんな感じ。

% more playbooks/get-facts.yml
---
- name: Get Device data
  hosts: all
  gather_facts: no
  connection: local
  tasks:
  - name: Get data from device
    napalm_get_facts:
      hostname={{ip}}
      username={{user}}
      dev_os={{os}}
      password={{passwd}}
      filter='facts,interfaces'
    register: result
  - name: print data
    debug: var=result

「filter」オプションで取得したい情報を記載します。残念ながら現時点では取得出来ない情報もあるようです。(configやARPテーブルなどは取得できず)

実行結果は以下の通りです。

% ansible-playbook -i hosts playbooks/get-facts.yml
PLAY [Get Device data] *********************************************************
TASK [Get data from device] ****************************************************
ok: [eos-1]
TASK [print data] **************************************************************
ok: [eos-1] => {
    "result": {
        "ansible_facts": {
            "facts": {
                "fqdn": "eos-1",
                "hostname": "eos-1",
                "interface_list": [
                    "Loopback1",
                    "Loopback2",
                    "Management1"
                ],
                "model": "CVX",
                "os_version": "4.15.7M-3284043.4157M",
                "serial_number": "",
                "uptime": 1513085,
                "vendor": "Arista"
            },
            "interfaces": {
                "Loopback1": {
                    "description": "",
                    "is_enabled": true,
                    "is_up": true,
                    "last_flapped": 1486210620.3110418,
                    "mac_address": "",
                    "speed": 0
                },
                "Loopback2": {
                    "description": "",
                    "is_enabled": true,
                    "is_up": true,
                    "last_flapped": 1486210759.9295466,
                    "mac_address": "",
                    "speed": 0
                },
                "Management1": {
                    "description": "",
                    "is_enabled": true,
                    "is_up": true,
                    "last_flapped": 1486155018.0522845,
                    "mac_address": "00:0C:29:53:21:7D",
                    "speed": 1000
                }
            }
        },
        "changed": false
    }
}
PLAY RECAP *********************************************************************
eos-1                      : ok=2    changed=0    unreachable=0    failed=0

コンフィグの追加

続いてコンフィグの追加を試してみました。

Playbookはこんな感じ。

% more playbooks/add-config.yml
---
- name: Add config
  hosts: all
  connection: local
  gather_facts: no
  tasks:
  - name: Add config
    napalm_install_config:
        hostname={{ip}}
        username={{user}}
        dev_os={{os}}
        password={{passwd}}
        config_file={{config_dir}}/{{hostname}}/config
        commit_changes=True
        replace_config=False
        diff_file={{config_dir}}/{{hostname}}/config.diff

「config」というファイルに追加する設定を記述し、「config.diff」というファイルに変更前と変更後のdiffの結果を保存するようにしています。

コンフィグ追加前のAristaのコンフィグは以下。

eos-1#sh running-config
! Command: show running-config
! device: eos-1 (CVX, EOS-4.15.7M)
!
! boot system flash:/EOS.swi
!
transceiver qsfp default-mode 4x10G
!
hostname eos-1
!
spanning-tree mode mstp
!
no aaa root
!
username test secret 5 $1$yl1ume/m$LNhZY2oO3iB0L9aCaEbGp0
!
interface Loopback1
   ip address 1.1.1.1/32
!
interface Loopback2
   ip address 2.2.2.2/32
!
interface Management1
   ip address 172.16.41.2/24
!
no ip routing
!
management api http-commands
   protocol http
   no shutdown
!
!
end

試しに、「loopback 3」を追加してみます。

% more configs/eos-1/config
interface loopback 3
ip address 3.3.3.3 255.255.255.255

実行結果は以下の通りです。

% ansible-playbook -i hosts playbooks/add-config.yml
PLAY [Add config] **************************************************************
TASK [Add config] **************************************************************
changed: [eos-1]
PLAY RECAP *********************************************************************
eos-1                      : ok=1    changed=1    unreachable=0    failed=0
eos-1#sh running-config
! Command: show running-config
! device: eos-1 (CVX, EOS-4.15.7M)
!
! boot system flash:/EOS.swi
!
transceiver qsfp default-mode 4x10G
!
hostname eos-1
!
spanning-tree mode mstp
!
no aaa root
!
username test secret 5 $1$yl1ume/m$LNhZY2oO3iB0L9aCaEbGp0
!
interface Loopback1
   ip address 1.1.1.1/32
!
interface Loopback2
   ip address 2.2.2.2/32
!
interface Loopback3
   ip address 3.3.3.3/32
!
interface Management1
   ip address 172.16.41.2/24
!
no ip routing
!
management api http-commands
   protocol http
   no shutdown
!
!
end

変更前と変更後のdiffの結果も問題なく保存されています。

% more configs/eos-1/config.diff
@@ -18,6 +18,9 @@
 interface Loopback2
    ip address 2.2.2.2/32
 !
+interface Loopback3
+   ip address 3.3.3.3/32
+!
 interface Management1
    ip address 172.16.41.2/24
 !

まとめ

AnsibleとNAPALMを連携するためのライブラリを用意してくれているので、簡単に連携することができました。今までAnsibleを使って大量のマルチベンダ機器をお守りしていた方は、NAPALMと連携させることでAnsibleの管理も楽になるんじゃないかと思います。
今回試したコードはGitHUBに上げておきましたので、興味がある方は試してみていただければ。

itbook/ansible_napalm

Viewing all 250 articles
Browse latest View live